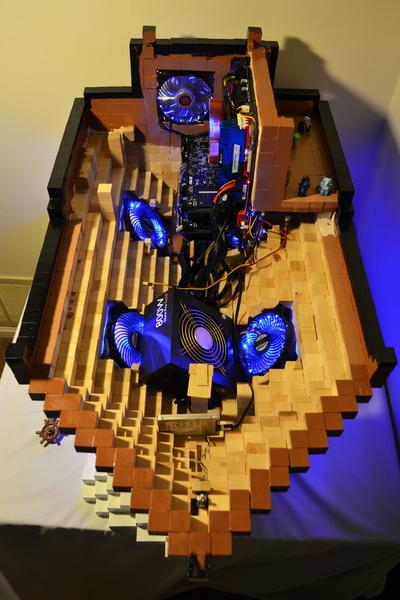
The 8-Bit Airship is my 5th mod and by far my largest. At about 3 feet in length and weighing about 90 lbs it is not hard to see how it’s the biggest one I own.
Before I start building my mods I make a set of goals that I want to accomplish with the mod. With all of the goals I make I try to do something different with each mod to make it unique. My Black Mage has an electrical field wand, the White Mage has glowing acrylic all around it, Link has a glowing sword and The Airship has spinning propellers.
I spend a few months brainstorming on my next mod before finally deciding on a character. I am an avid Minecraft player and tried making the 8-Bit Airship in the game to help visualize what it will look like once I start to build it in real life. This saved me some time compared to when I would draw it up on paper trying to measure it. Having a model to follow proves very beneficial in the build process. I was able to build it block by block following my Minecraft game design of the Airship.

I wait until the beginning of every year before I start to physically build the case. This year I went with an airship from Final Fantasy, as it is an iconic figure from the games and I believed it would make a neat mod. My goal was to make a heavy duty gaming setup capable of handling overclocking and a dual graphic card setup. I realized I was going to need a sizable amount of space to fit all the gaming components that was going to be needed which is why I went with the airship; it was a perfect match to have enough room to house it all comfortably.
I ordered 2,000 wooden cubes and one bottle of wood glue then began my work. With my model up on Minecraft as a reference I began gluing the cubes together. When I am building I have to reference the computer components I’m using to make sure they all will fit when I am done gluing. The parts need to fit where they will ultimately be resting. I’ve got caught a few times finishing a large section of a computer case only to find out that the graphic card won’t fit where I thought it would. This is now my number one concern when building a mod because you can lose a lot of time fixing mistakes that could of been avoided by measuring. Measure twice, glue once has become a thing to remember for me.

After finishing the hull on this mod I encountered my biggest challenge; the spinning propellers. I try to only use PC components when modding. This means I had to use case fans to make the propellers spin. After multiple failed experiments I was able to rig a system to get the propellers to spin. I used epoxy to glue a rod from the fan to the propeller. I attached the propellers to a fan controller board to get the correct amount of RPMs for the fans. Regarding the power button, the motherboard is located in the back of the mod while the power button is in the front so I needed to lengthen the line. Nothing a little solder and extra write couldn’t fix.
I went with acrylic windows to show off the motherboard and heatsink of the cpu. The case comes off in 3 sections depending on what you need to do in the PC. If I only need to get access to the motherboard only one section has to be moved.

The second hardest part was making pixelated clouds to hold the case up. The clouds were very important to make it look like the airship is flying and not just a normal boat. I made a few different versions but ultimately stuck with a more flatter design. After I was done fitting the PC components I just had to paint. I actually do not look forward to painting because the dry time is long with oil based paint. I use oil-based since its more resistant to scratching than latex. I like to keep a steady pace when working but if paint is involved it requires patience daily, which I lack unfortunately. Watching paint dry is never entertaining.
Now that The Airship is done I am looking forward to getting ideas on my next build. I have a few thoughts but only time will tell what I decide on.
For a full build log on the 8-Bit Airship head over to our ROG Forums

