

ASUS UEFI breakdown – Ai Tweaker
As this guide covers manual overclocking, we’ve taken the time to detail the role of overclocking-related parameters that are within the UEFI. Study carefully, as you need to become familiar with the interface and various functions in order to apply an overclock. An easier way of doing things is to use the ASUS 5-Way Optimization software, a subject we may visit at a later date. Today is all about getting down and dirty with ASUS motherboard firmware.
The Ai Tweaker section in the UEFI’s Advanced Mode is our area of focus. We’ll pick out functions of interest, or those that often raise questions, and provide some insight about what they do and when to use them.
Don’t worry if this all appears too daunting at first. Later sections detail which settings you need to adjust and the methods of putting things into practice. You only need to adjust a few of the available settings to overclock the system. We’ve gone well overboard here, but that’s because we want to provide you with a valuable resource in order to save work later (well, sorta!). Plus, it looks technical, and we like technical.
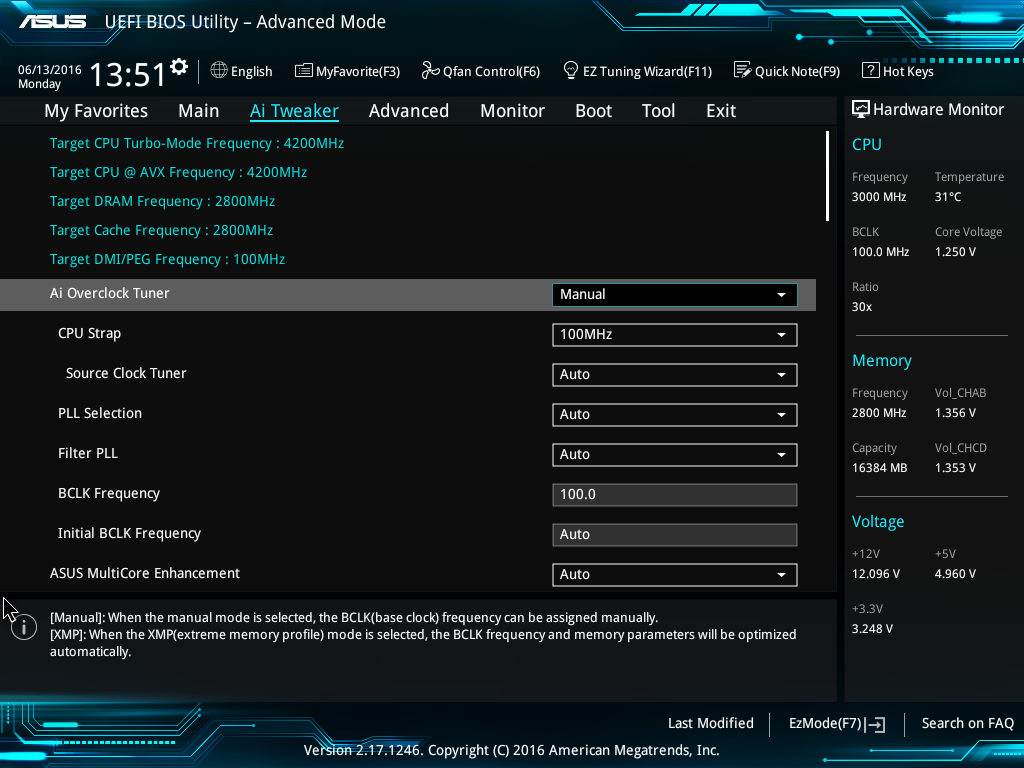
Ai Overclock Tuner: Set to Manual if you wish to adjust BCLK manually; this makes the CPU Strap, Source Clock Tuner, PLL Selection, Filter PLL, BCLK Frequency, and Initial BCLK Frequency settings available.
Use the XMP setting to apply the Extreme Memory Profile of compatible memory modules.
CPU Strap: Changes the reference clock frequency supplied to the CPU and memory in comparison to other domains. This setting is multiplied by the applied CPU core and DRAM ratios to obtain the operating frequency of each domain. The default setting is 100 MHz, which results in a one-step CPU ratio change producing a 100-MHz change in the processor’s operating frequency. For example, if the CPU core ratios are set to 44X, the operating frequency will be 4400 MHz. A CPU Strap setting of 125 MHz with the same 44X CPU core ratio produces 5500 MHz (44 X 125).
100 MHz is preferred unless the applied XMP profile requires a specific DRAM ratio for stability.
Source Clock Tuner: This setting offsets the reference clock for the DMI bus to help keep it within stable limits when changing BCLK. It can be left on Auto unless you wish to experiment with high BCLK settings.
PLL Selection: Changes the PLL oscillator mode. The options are LC or SB. LC uses an inductor and capacitor-based oscillator, while SB uses a shaping-based oscillator. LC-based PLLs have lower jitter but limited frequency range. SB PLLs have better range but increased jitter. The LC PLL mode is preferred for the 100-MHz CPU strap and default BCLK. SB-based is preferred when changing BCLK from default. This setting can be left on Auto for all normal use.
Filter PLL: Can be used to improve CPU and memory stability when BCLK changes are made. Select the relevant High or Low BCLK setting according to the applied BCLK frequency.
BCLK Frequency: BCLK is the reference clock supplied to the CPU, Uncore, memory, PCIe, and DMI buses. Hence, any changes to BCLK will affect all associated domains. Ordinarily, changes to BCLK should not be required for a system that will be used as a workstation or gaming rig. The only exceptions to that rule are when a DRAM ratio that requires a different CPU strap needs a slight BCLK offset to obtain the correct memory frequency.
If manual changes are to be made, do not stray too far from +/- 3 MHz from the default BCLK frequency for a given CPU strap. The target CPU frequency is shown at the top left of the Ai Tweaker page.
Initial BCLK Frequency: This setting modifies the BCLK value that will be used during POST. By default, it is set to the same value as BCLK Frequency. Changes can be useful in situations where a system is stable when in the operating system but sometimes fails to POST. An offset up to 5 MHz below the BCLK frequency may help get past the POST process consistently. The side effect of applying such an offset is that all buses will be “trained” according to the Initial BCLK Frequency, which can affect overall stability in the operating system. Therefore, this option should only be used as a last resort when changes to voltage and memory timings do not help.
ASUS Multicore Enhancement: Setting to Auto applies the Turbo ratio to all cores. Setting to Disabled uses Intel Turbo policies. These options are only effective at stock CPU settings. When a manual overclock is applied, the Turbo ratios are assigned according to the CPU Core Ratio settings.
CPU Core Ratio: There are three options for core ratio control:
Sync all cores: All core ratios will be set to the same value.
By Core Usage: Allows ratios to be applied to each core independently. In this scenario, when non-threaded applications are run, they can be assigned to cores that are running at a higher frequency to improve performance. However, current versions of the Windows operating system are configured to balance loads across all available cores, which results in all available cores reverting to the same ratio as the slowest core when faced with a workload. The workaround is to assign processor affinity for non-threaded workloads manually via the Windows Task Manager.
By Specific Core: This setting works in conjunction with the Intel Turbo Boost Max Technology 3.0 driver to automatically assign applications to specific cores. Intel determines which core has the best frequency potential during production and refers to it as the “favorite core.” An asterisk in the UEFI highlights the favorite core. By default, the Turbo Boost 3.0 driver will assign single-threaded workloads to the favorite or fastest core. Workloads that can run on more than one core are assigned to the next fastest core, and so on down the list.
We recommend using the Sync All Cores setting in association with the ASUS Thermal Control Tool to get the best performance from the Broadwell-E architecture. The By Core Usage and By Specific Core settings have caveats that negate their benefit when a system is overclocked. Further reading on this subject is available in the ASUS Thermal Control Tool guide.
AVX Instruction Core Ratio Negative Offset: This setting reduces CPU core frequencies by the applied value when an AVX workload is run. The thermal output of AVX workloads is an order of magnitude higher than for non-AVX workloads, which is why this setting has been introduced. In theory, we can utilize a higher operating frequency for light-load applications while heavy-load applications that contain AVX code will downclock the processor to help keep core temperatures below the throttling point. However, this setting requires the CPU core voltage to be left in Auto or Offset modes that have implications for overclocking. We recommend using the ASUS Thermal Control Tool instead of this feature. Further reading on this subject is available in the ASUS Thermal Control Tool guide.
Min CPU Cache Ratio: Sets the minimum Uncore ratio. The minimum ratio is active when the CPU is in low-power state.
Max CPU Cache Ratio: Sets the maximum Uncore ratio. The maximum ratio is active when the CPU is loaded. The cache (Uncore) frequency is determined by multiplying BCLK by the cache ratio. The target frequency is shown at the top left of the Ai Tweaker page.
Internal PLL Overvoltage: Boosts the internally derived PLL voltage to help enhance CPU core overclocking margins. We have not found this setting to affect normal overclocking. Your mileage may vary.
BCLK Frequency: DRAM Frequency Ratio: Sets the ratio of DRAM frequency to BCLK. For normal use, this setting can be left on Auto, as it will choose the best ratio according to the user-selected DRAM Frequency.
TPU: Applies a preset overclock to the system. There are two options. Option I is less aggressive and suitable for air cooling. Option II is more aggressive and requires water cooling for the CPU. However, it is preferable to use 5-Way Optimization auto tuning to obtain the overclock rather than rely on static profiles. The 5-Way optimization software tailors the overclock according to the capabilities of the components in the system.
EPU Power Saving Mode: Applies a variety of energy-saving protocols to reduce system power consumption. This setting should only be used at stock processor frequencies; we do not recommend using it when overclocking the system.