

There’s been a long-standing arms race between game developers and cheaters. To keep competitive online games fair and honest, developers have to keep deploying new tactics in order to keep up with the tools used by those willing to cheat their way to dishonest victory. One relatively recent move in this arms race is a requirement for Secure Boot. Perhaps you’ve run across such a game recently: EA is requiring Secure Boot for Battlefield 6, as many gamers discovered during open beta weekends. Valorant requires the feature, as well.
If you haven’t run across Secure Boot before, you may have some questions. For most folks running modern PC hardware, it’s fairly straightforward to enable. This FAQ will help you get started.
What is Secure Boot?
As its name suggests, Secure Boot is a security feature built into your PC’s UEFI firmware (the modern replacement for legacy BIOS). Secure Boot helps protect your computer from malicious software that could try to load before your operating system. It does this by checking the signature of boot-related files against a list of trusted cryptographic signatures from operating system bootloaders, hardware drivers, and firmware components.
The primary purpose of Secure Boot is to stop bootkits and rootkits, which are pieces of malicious code that load before the OS, making them very hard to detect and remove once running.
Secure Boot was first introduced with the release of Windows 8 in 2012. Windows 11 requires that your system be capable of Secure Boot, and recommends that you keep it enabled, but that’s not a strict requirement. This means that most Windows 11 laptops, prebuilt desktops, and custom PCs probably have Secure Boot enabled already. If you built a custom PC for Windows 10, it’s possible that you’ll need to enable Secure Boot manually.
Why do some games require Secure Boot?
Some modern cheating tools for competitive games try to inject code before the OS fully boots or load unsigned kernel-level drivers that can hide from normal detection. (A side note: it is incredibly foolish to trust the creator of cheating software with this level of access. Winning a Call of Duty match is not worth the risk to your data.)
To counter this strategy, an increasing number of anti-cheat software tools such as Riot Vanguard work to block this by making sure that your system’s boot chain is trusted. With Secure Boot on, it’s much harder for a cheat developer to install a persistent kernel-level cheat without breaking the signature check.
What games require Secure Boot?
Currently, only a small number of games require Secure Boot. Battlefield 6 and Battlefield 2042 require the feature, as will Call of Duty: Black Ops 7. Riot Vanguard, the anti-cheat system used for Valorant and League of Legends, requires Secure Boot as well.
Some online tournaments require the use of Secure Boot, even though the games being played do not require it for standard multiplayer matches.
How do I check to see if Secure Boot is enabled on my PC?
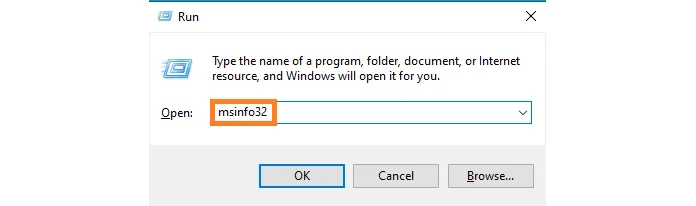
To see if Secure Boot is enabled on your PC, start by pressing the [WIN] + [R] keys simultaneously to open the Run dialog box. Type in msinfo32 and press OK.
The System Information window will open. Look for “Secure Boot State.”
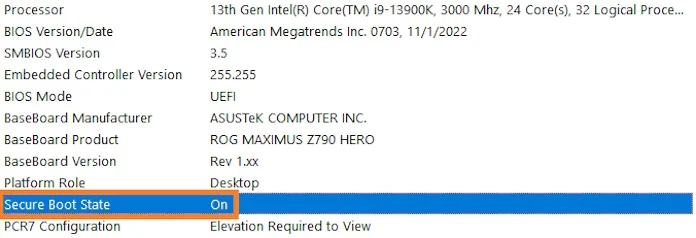
If Secure Boot State is shown as “On,” you’re good to go with games that require the feature. If it’s “Off,” then you’ll need to spend a little time activating the feature in the UEFI.
What are the requirements for enabling Secure Boot?
For complete information on the requirements for Secure Boot, check out Microsoft’s comprehensive resource.
On the hardware side, ASUS motherboards have supported Secure Boot for years. If you’re using a motherboard manufactured since 2012, it should support the feature. Older motherboards might not meet other requirements for the game that you’re trying to play.
Potentially, the partitioning scheme of the drive used for your Windows installation might also factor in to your ability to enable Secure Boot. If you run into difficulties while trying to enable Secure Boot, check the partitioning scheme for your boot drive. If you’re using Master Boot Record (MBR), the legacy format, you won’t be able to enable Secure Boot. However, the newer GUID Partition Table (GPT) has been in service for many years, and since it’s necessary for the installation of larger drivers and for booting in UEFI, it’s likely the mode that your system is using.
How do I enable Secure Boot?
In order to enable Secure Boot, you’ll need to venture into the UEFI. In the UEFI, you’ll find fundamental controls for setting up your PC hardware. While some features in the UEFI require advanced knowledge, others are quite straightforward. Please note that the instructions here are specific to ASUS motherboards. For motherboards from other brands, please check their documentation for instructions.
Secure Boot is easy to enable. Start by powering on your system and pressing the [Delete] key when prompted to enter the UEFI BIOS Utility. If you’re using an ASUS gaming laptop, press F2 to enter the UEFI.
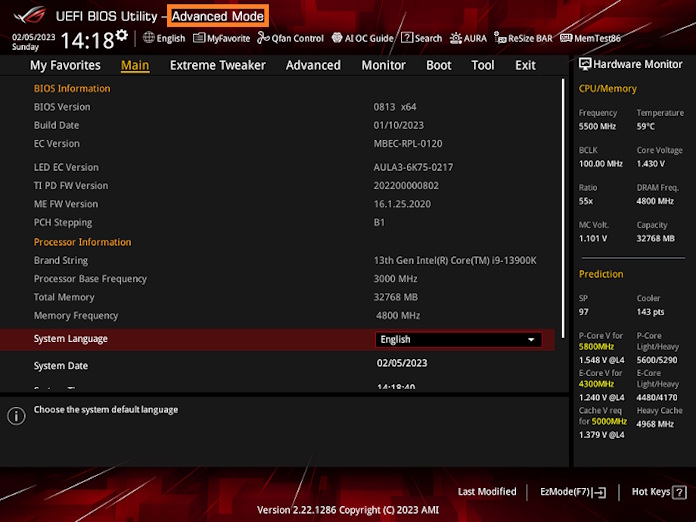
Ensure that you’re in Advanced Mode as shown above. (The interface looks a bit different for laptops.)
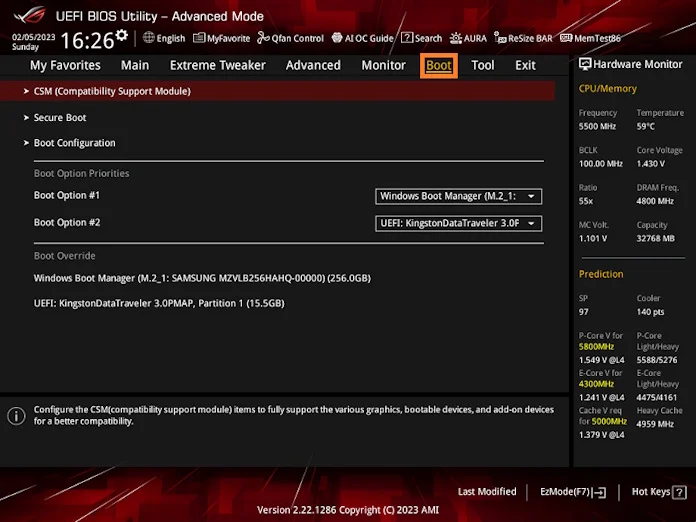
Click on the “Boot” menu. Or, for laptops, find the Security menu.
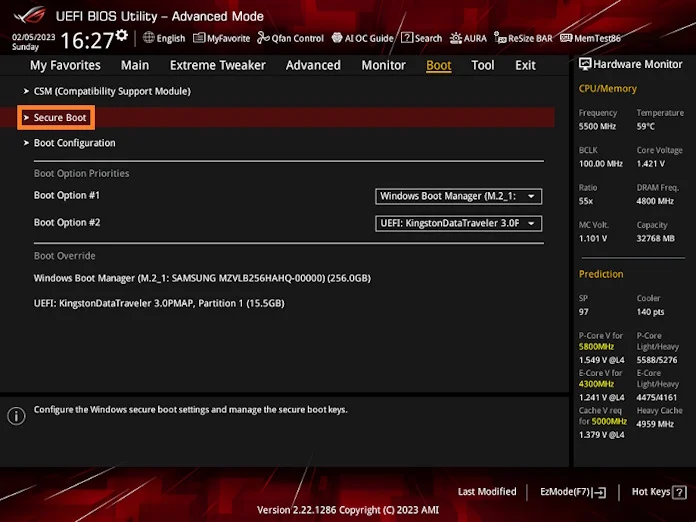
Select “Secure Boot” in the Boot menu.
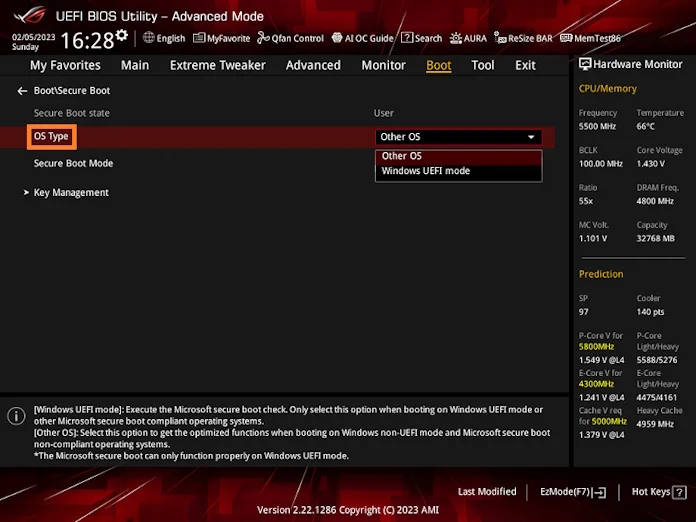
To enable Secure Boot, select the “OS Type” dropdown, and select “Windows UEFI mode.” Then, switch “Secure Boot Mode” to “Standard.” For your laptop, ensure the Secure Boot is listed as “Enabled” in the dropdown.
For more information on enabling Secure Boot, check out our support page.
What if I enable UEFI mode and my drives don’t show up?
If your boot drives use the legacy MBR partitioning scheme, you might run across a problem where your boot drives won’t be visible after switching to UEFI mode. In order to switch to UEFI mode so that you can enable Secure Boot, you’ll need to use GPT instead.
Thankfully, there’s a tool to do this without data loss. Windows has a built-in tool called MBR2GPT which can help convert a legacy Windows 10 installation based on a GPT partition scheme to modern UEFI. Your installation will need to meet certain prequisites: Windows 10 x64, version 1703 or later; no more than three partitions; no bitlocker encryption, and no dual-boot. If your installation fits these requirements, flip your BIOS mode back to legacy and follow the steps in this guide from Microsoft. After that, you should be ready to go back into BIOS, switch to UEFI mode, and enable Secure Boot.
Can I use Secure Boot with an older motherboard or legacy hardware?
The short answer is yes: it is possible to enable Secure Boot on an older installation. But there are certain configuration options that you might be using with your older PC that require you to complete some additional steps in order to get Secure Boot up and running.
For example, perhaps you have older hardware installed that only functions with the Compatibility Support Module (CSM) enabled. Ideally, CSM should be disabled, but if that solution isn’t viable for your hardware setup, you do have a workaround. Adjust the Boot Device Control setting in the CSM submenu to either “UEFI Only” or “UEFI and Legacy OPROM.” After changing this setting, check the partitioning scheme for your boot drive to ensure that it uses GPT rather than MBR. Then, enable UEFI mode and Secure Boot.