

With summer travel season in full swing, about half of all Americans are heading out for a much-needed vacation. Safe travels are always the goal. Sadly, tourists can often become targets for criminals and bad actors looking to steal their wallets or passports. Today’s cyber-attackers can also target a tourist’s identity or financial information. You can purchase some much-needed travel insurance for yourself or your loved ones by taking along an ASUS RT-AX57 Go travel router.
A travel router will give you significant peace of mind as you travel, all while making it easy to keep your all devices connected, especially if you’re traveling with a group. To get the most of the RT-AX57 Go, you should spend some time setting up the router before you walk out the door. After all, once the vacation begins, you’ll want to devote all your attention to making the most of it. This guide includes everything you need to get the job done.
Setting up the RT-AX57 Go for home use
Open the cardboard box and look for the Quick Setup Guide. Later, you’ll use this guide to download the ASUS Router app onto your smartphone. For now, remove the router, AC/DC adapter, and Ethernet cable from the box. We plan to use your new router both at home and while traveling, so we’re going to customize this setup for dual use. We’ll make one profile for home use and another for travel. Switching between the two profiles will be as easy as pushing a button.
To get started, plug the AC/DC adapter into a convenient outlet and insert the power cable into the DCIN port on the back of the router. Then, look on the side of the router for the Multi-Function Button, which is a switch that slides from left to right and back. Slide the switch so that the dot on the slider is positioned to the right. This puts the Multi-Function Button into Home mode. Now we can set up the router for home use in the default “Wireless Router Mode.”
For the quickest and easiest setup, connect the RT-AX57 Go to your existing WiFi router. You can use the Ethernet cable included with the RT-AX57 Go. Simply plug one end of the cable into one of your existing WiFi router’s open ports and the other end into the RT-AX57 Go’s WAN port. Next, grab your smartphone and make sure your “Location” and “WiFi” are turned on in the phone’s settings. Then use your smartphone to scan the QR code printed on the Quick Setup Guide and download the ASUS Router app. This installation will only take a couple minutes.
Once the ASUS Router app is downloaded, you’ll need to accept the End User License Agreement. Then review the “ASUS Privacy Notice” and tap “Agree.” On the next screen, tap the top icon, “Setup: Set up a new router.” You’ll be offered three sets of ASUS routers to choose from, and you’ll tap the top option again, “ASUS WiFi routers.”
When you are asked to give the ASUS Router app permission to access your device’s location, consent. The next screen should give you the available ASUS Router options that you can connect with. If there are multiple options on this screen, choose the option that has the same MAC address as the MAC printed on the side of the box your router came in. (If the print on this label is too small for you to read, try using your smartphone to take a photo of the label and then enlarging the photo on your phone’s screen so it’s easier to read.)
In the ASUS Router app, you will then be asked whether you want to set up the RT-AX57 Go in “Public WiFi Mode (WISP)” or “Wireless router mode.” Since we put Multi-Function Button in Home mode earlier, select “Wireless router mode” here. You will be prompted to create a new name for your network, or an SSID. Choose something different from the name of your home’s existing WiFi network, and make it a name you’ll be sure to remember. Then create a new password that people will use to log onto your new WiFi network. If you intend to use the same SSID and password for your Travel profile, you should choose a unique password that you won’t mind sharing with friends and traveling companions.
At this point, you may need to help your smartphone communicate with the ASUS RT-AX57 Go. The ASUS Router app will prompt you to accept this connection to the router. The router will be identified as “ASUS_D4.” Tap or click on that name to establish the connection and proceed to setting up your network and credentials.
Next, you’ll be asked to create a username and password for your Administrator credentials. This username and password will let you access the router’s settings when you are at home or traveling. Choose a username you will remember, and choose a new, unique password that nobody else knows.
If this is the first time you’re setting up your new RT-AX57 Go, you’ll probably be asked to update the router’s firmware. Having the latest firmware installed gives you up-to-date security, so always agree to do it. Since firmware updates typically only come out every year or two, you won’t have to worry about them very often. After the firmware updates, the ASUS Router app will go into network optimization mode. Then you’ll receive two friendly, reassuring messages that “Your network is operating perfectly” and you have a “Good connection!”
Before you proceed, it’s a good idea to turn on AiProtection mode so you can make the most of the AiProtection security software provided by ASUS routers. At the bottom of the ASUS Router app, tap the right-most icon that looks like a gear to open “Settings.” In the settings menu, find and tap “AiProtection,” and then slide the button to the right beside “Enable AiProtection.” You’ll need to accept the terms of service from Trend Micro, which provides updates to keep your security software up to date.
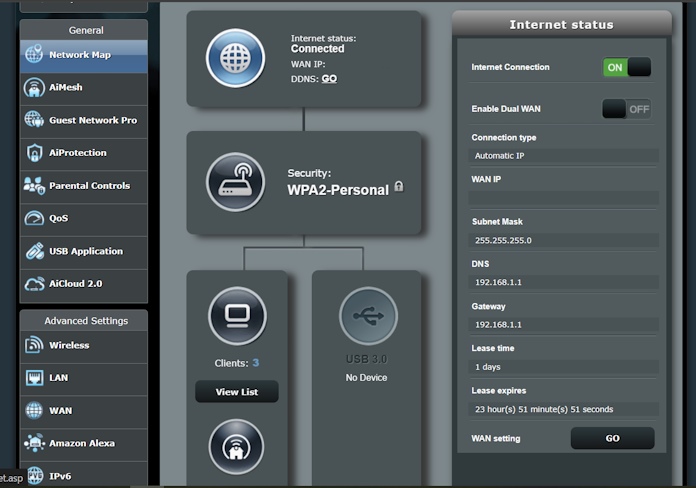
Now, your RT-AX57 Go is operating as a second WiFi network in your home. You can connect any devices to this network and enjoy all the features included with every ASUS router, like Guest Network Pro. This feature helps you set up subnetworks for guests, children, VPNs, or smart home devices. Since we want to help you take the RT-AX57 Go with you on the road, the next step is to set up the router in Travel mode.
Setting up the Multi-Function Button
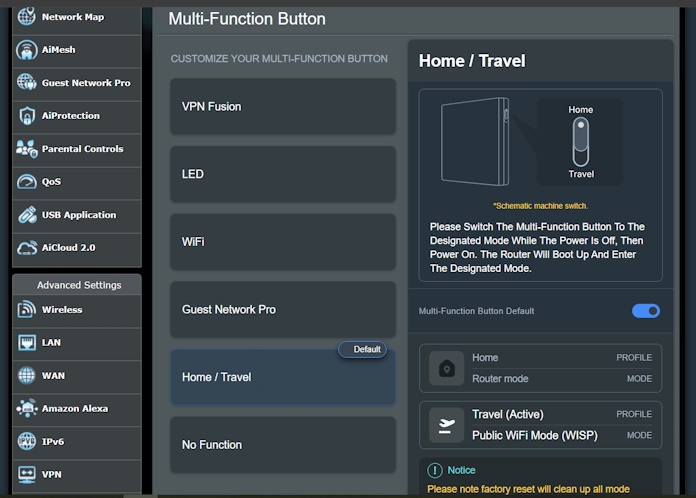
We want you to be able to switch between Home and Travel modes in the easiest way possible. The ASUS RT-AX57 Go comes with a slide on the side of the router called the “Multi-Function Button.” The ASUS Router app lets you assign one of several different functions to this button. To set up the button for our use, tap “Home” on the main screen of the ASUS Router app. Above the bottom row of buttons are three more buttons, and you’ll tap the central one. Then, near the top of the screen, tap the lower of the two buttons marked “RT-AX57 Go.” Finally, tap “Multi-Function button” under the Management heading. Select the second option from the bottom, “Home/Travel,” and make it the default setting for the Multi-Function Button. When the “Home/Travel” screen opens, look for the slider next to “Multi-Function Button Default” and slide it to the right. Now your RT-AX57 Go should establish the top “Home Profile” as being “Router mode.” The bottom “Travel” profile will be blank.
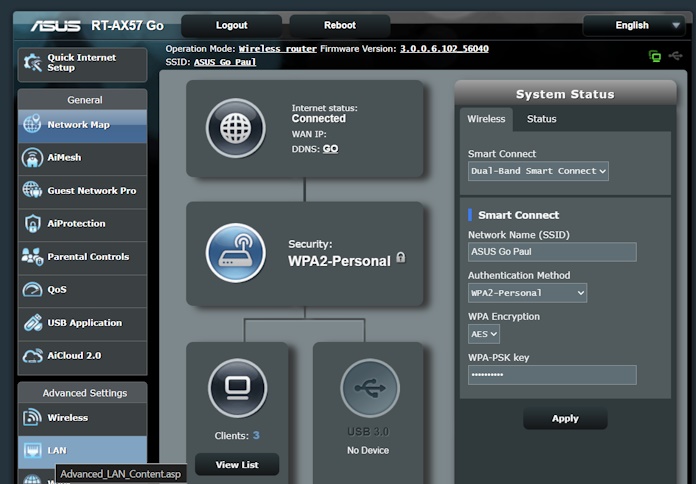
This is a good time to learn how to use the other way you will manage your RT-AX57 Go travel router. While traveling, you may find it more convenient to manage the router through your laptop computer’s internet browser. To practice using this interface, switch over to your laptop or tablet computer. To access the graphic user interface, connect your laptop to the RT-AX57 Go’s WiFi network you created, open your preferred web browser, and type the following numerical sequence into the address bar: 192.168.1.1
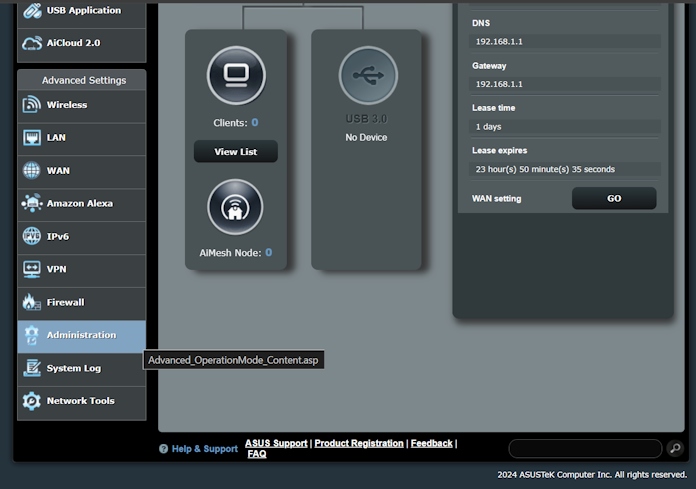
Your browser will open the asusrouter.com webpage and ask you to enter the Username and Password that you established earlier for your router’s Administrator credentials. If you did not set up the Multi-Function Button through the ASUS Router app, you can set it up in your browser’s graphic user interface. Find the setting by looking at the lefthand column of the interface under the heading “Advanced Settings.” Scroll down and click on the “Administration” button. You’ll be taken to a screen that shows you what mode the RT-AX57 Go is operating in. On the new screen, look at the far right for the tab marked “Multi-Function Button” and click on it. Then select “Home/Travel” and slide the button next to “Multi-Function Button Default” as before.
Setting up the ASUS RT-AX57 Go in Travel mode
The last thing to do is set up the Travel profile. You can do this at home so the Travel profile is ready to go once your vacation begins. To start, power down the ASUS RT-AX57 Go by unplugging its power cable. Next, unplug the ethernet cable from the ASUS Go’s WAN port. Then switch the Multi-Function Button to the left, which puts the router into Travel mode. Finally, plug the router’s power cable into its DCIN port.
You’ll see the LED light pulse green while the Go boots up. When the LED turns red, you’re ready to set up the router in Public WiFi Mode (WISP). For now, we’ll treat your existing WiFi network like it’s public WiFi.
Since we are setting up a new Travel profile, we will repeat some of the steps you went through while setting up your Home profile. Try setting up this profile through your laptop or tablet computer’s web browser so you have some practice with both methods of controlling your router. Reconnect to the RT-AX57 Go by typing asusrouter.com into your address bar, or use the numerical sequence 192.168.1.1 as you did before. Repeat the steps we followed last time, but with one important change: When the router asks what mode you want the router to operate in, you’ll select “Public WiFi Mode (WISP).” That is the mode you’ll use on vacation whenever you need to connect to public WiFi networks. If you didn’t already disconnect the Ethernet cable, the app will prompt you to unplug it now.
You’ll be prompted to select a target WiFi network to connect with the RT-AX57 Go. Select your home’s existing WiFi network SSID, then type in your network’s password. Next, you’ll be asked to select an SSID for your travel WiFi network, along with a password that you and your traveling companions will use to connect to your private network. You should use a unique password that you don’t mind sharing with friends. Once your friends and family connect their devices to this SSID and password, their devices will automatically reconnect to your travel network whenever you activate it. From their point of view, you’ll look like a wizard offering stable, secure, free internet access everywhere you travel.
Next, you’ll be asked to identify a username and password for the Administrator credentials of your Travel profile. You should use a username you’ll easily remember and a unique password known only to you. These are the credentials you can use to control the router and set up new networks anytime you need to.
The program will apply the new settings for a few moments. At this point, you are mimicking the process you’ll follow to set up the ASUS RT-AX57 Go while traveling. Whenever you land in a cruise ship, airport, or other place with public WiFi and want to get all your devices up and running quickly, you’ll go through a similar process. In each case, you’ll just need the public WiFi’s SSID and password. And if the ASUS Router app or browser interface asks you to establish an SSID and password for your private network, you can keep using the same ones for the sake of convenience.
After you set up your new private travel network, the telltale LED on the side of the ASUS RT-AX57 Go will blink green for a while. Once the light shines a constant white, the travel router is connected to the public WiFi and ready for all your devices to connect with it. The next time you’re out and about, all you’ll have to do is make sure the Multi-Function Button is switched left for Travel mode, plug in your Go, and connect it to the public WiFi network of the establishment you’re in. You’ll activate your secure, private WiFi network with a few easy steps. Once the LED is shining white, all your friends and family can use the same network they were using in the airport, on the cruise ship, or in your last AirBnB.
Some advice to make using the ASUS RT-AX57 Go while you travel even easier: If your laptop computer has a USB Type-A port or a USB Type-C port, you can power the router from your computer. This feature lets you leave the AC/DC adapter at home and frees you from needing a to sit near a wall plug with your RT-AX57 Go. Just get your hands on a cable that has fits your laptop’s port on one end and has a USB Type-C connector on the other end. To power up the RT-AX57 Go, you’ll plug one USB Type-C jack into the router’s DCIN port and the other end into your laptop.
Integrating the ASUS RT-AX57 Go into your home network
Back home, you can get a lot of use from your ASUS RT-AX57 Go in either Home or Travel mode. Ask yourself if your house has any WiFi dead spots. Is there a place where your WiFi connections get slow or glitchy, like the corner of a room far away from your home’s router or a backyard patio? Your ASUS RT-AX57 Go can solve that problem in a few simple steps.
If your home router is made by ASUS and supports Mesh WiFi, you can turn on the RT-AX57 Go’s ASUS AiMesh technology. Now the travel router becomes an additional node in your home network, which will expand your network’s coverage while boosting its reliability. Place it near your dead spot to clear up the problem right away.
If your existing router does not support mesh WiFi or isn’t made by ASUS, we have a solution. Switch the Multi-Function Button to Travel mode, putting the router into WISP mode. Then place the router near the dead spot in your home, someplace close enough to your home’s router to have a solid WiFi connection. After you plug in the RT-AX57 Go, it will act like a signal repeater for your home’s WiFi. The travel router will pick up your home router’s signal and send it along to wherever you’ve placed it. With this technique, I was able to extend my home’s WiFi network into the notorious dead spot in my backyard. To have fast and reliable WiFi in my backyard, all I have to do is connect my devices to the RT AX57 Go’s Travel network rather than my home’s WiFi. With this technique, all your WiFi dead spots can be livened up.
Of course, you can always flip the Multi-Function Button into Home mode and plug an Ethernet cable into the WAN port on the ASUS RT-AX57 Go. This will give your home a fully functional second WiFi network that won’t interfere with your existing network. Use it for anything you like. Assign the new network a unique name and password, then let friends and family connect through the new network while keeping your primary network’s password a secret. Or assign your second network for children, then use the Parental Control features of the ASUS Router app to limit the kids’ screen time and access to harmful content or malicious websites.
With a little creativity at home, you’ll make the most of the ASUS RT-AX57 Go travel router wherever you are. And before heading out the door, you’ll be tempted to grab the RT-AX57 Go. Whether you plan to work for a few hours at a local café or tour the high seas on a luxury liner, you’ll have the security and convenience of your own network.