Thanks to XMP, EXPO, and AEMP profiles, getting your PC memory up to speed with an ASUS motherboard is typically a very straightforward affair. But sometimes your situation calls for a bit of tuning. Due to module-to-module variance, your memory kit might be capable of even higher speeds than advertised, or on the flip side, you might find that you’re not quite getting the experience that you’re looking for. If your motherboard doesn’t offer a remedy for either of these situations, you might be left with no choice other than to settle for less and downclock your RAM. But if you’re using an ASUS Intel 800 Series motherboard or one of many of our AMD AM5 motherboards, you’ll have DIMM Fit and DIMM Fit Pro ready to meet the moment. These BIOS features can help you find an additional bump in stability so that you can achieve sustained performance.
DIMM Fit and DIMM Fit Pro stand to help users in a variety of scenarios:
- Achieving higher memory overclocking frequencies. Fairly regularly, PC builders will encounter a situation where a higher memory overclock seems possible on paper, but their system can’t maintain stability. For example, a user might have a well-appointed DDR5-6800 kit that will POST when it’s kicked up to 7000 MT/s, but the system crashes shortly after. The iterative testing process of DIMM Fit and DIMM Fit Pro could help elevate signal integrity to the point that the system is stable at the higher frequency.
- Resolving compatibility concerns. Seasoned PC builders know to check their motherboard’s QVL to ensure seamless compatibility between their board and their memory kit. But what about builders who have an older memory kit that they’d like to repurpose for a new rig? DIMM Fit and DIMM Fit Pro might be able to resolve compatibility issues with the memory kit, saving users from the need to contact customer service — or the need to purchase new memory.
- Troubleshooting a memory kit that isn’t getting up to speed. It’s thankfully rare, but it does happen: sometimes it takes a bit of work to get a memory kit up and running at its rated speed. DIMM Fit gives mainstream builders an easy-to-use tool for finding optimized, stable settings, while DIMM Fit Pro allows advanced users to customize the process.
DIMM Fit vs. DIMM Fit Pro
DIMM Fit and DIMM Fit Pro are especially valuable due to the fact that there’s no single memory parameter that boosts performance and stability, but rather a combination of co-dependent parameters. Adjusting one affects the others. That’s why finding memory optimization nirvana at your desired clock speeds and timings involves an iterative, time-consuming process of tuning and stress testing.
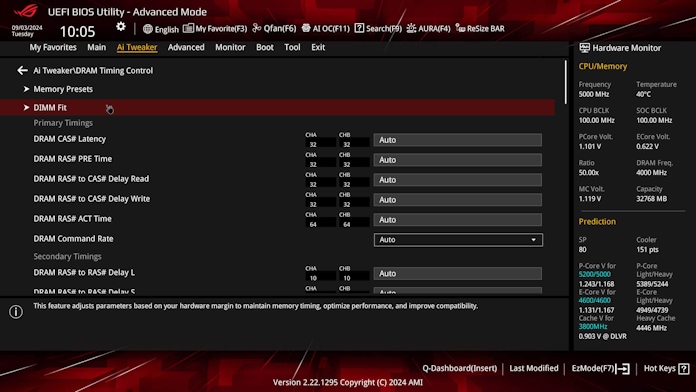
Two ASUS-exclusive BIOS features, DIMM Fit and DIMM Fit Pro, help streamline the process. The former runs a precise analysis to optimize performance for compatibility and system stability. When activated from the UEFI, the DIMM Fit algorithm performs a grid search on the interface signaling registers, finding hyperparameters that optimize stability for that kit. Because memory testing takes time, the process can take hours instead of minutes, but the entire process is fully automatic, and the parameters will be saved so they can be used in the future.
| DIMM Fit | DIMM Fit Pro | |
|---|---|---|
| Tuning options | Fixed preset options | User-defined options |
| Results display | No | Yes |
| Complexity | Easy and automatic | Complex yet flexible |
| Tuning parameters | Limited MRC options | Full timing control options |
We heard from veteran PC builders that they appreciated DIMM Fit’s approach but were hoping for a system that gave them more granular control over the process. We’ve been working hard to accommodate this request, and we’re now ready to share the fruits of that effort.
With the latest firmware update, users of an ASUS Intel 800 Series motherboard or many of our AMD AM5 motherboards can now access DIMM Fit Pro. In a straightforward interface, DIMM Fit Pro offers a transparent and customizable interface for optimizing memory subtimings. Instead of preset options, you’ll be able to decide which items that you’d like to include in the fitting process, the testing range for each parameter, the testing order, and the number of testing iterations. Available parameters include everything on the Timing Control page in the UEFI, giving you a wealth of possibilities to pick from.
Which ASUS motherboards support DIMM Fit and DIMM Fit Pro?
A wide range of the latest ASUS motherboards offer support for DIMM Fit and DIMM Fit Pro. You’ll be able to access these BIOS features with any ASUS Intel 800 Series motherboard, which includes the models from our Z890 and B860 lineups.
It’s quite likely that your ASUS AM5 motherboard can access DIMM Fit and DIMM Fit Pro, as well. Support for the feature is quite common across our enthusiast-grade X870E/X870 and X670E lineups, and you’ll find access some of our most popular B850 and B650 options, as well.
Here’s a full list of the compatible motherboards. For your convenience, each product listing is linked to its support page, as you may need to apply a firmware update to your motherboard in order to access DIMM Fit or DIMM Fit Pro.
| ASUS X870E and X870 Motherboards |
|---|
| ROG Crosshair X870E Extreme |
| ROG Crosshair X870E Apex |
| ROG Crosshair X870E Hero |
| ROG Crosshair X870E Hero BTF |
| ROG Strix X870E-E Gaming WiFi |
| ROG Strix X870E-E Gaming WiFi |
| ROG Strix X870-F Gaming WiFi |
| ROG Strix X870-A Gaming WiFi |
| ROG Strix X870-I Gaming WiFi |
| ROG Strix X870E-H Gaming WiFi7 |
| TUF Gaming X870E-PLUS WiFi7 |
| TUF Gaming X870-PLUS WiFi |
| ProArt X870E-CREATOR WiFi |
| ASUS X670E and X670 Motherboards |
| ROG Crosshair X670E Extreme |
| ROG Crosshair X670E Hero |
| ROG Crosshair X670E Gene |
| ROG Strix X670E-E Gaming WiFi |
| ROG Strix X670E-F Gaming WiFi |
| ROG Strix X670E-A Gaming WiFi |
| ROG Strix X670E-I Gaming WiFi |
| TUF Gaming X670E-PLUS |
| TUF Gaming X670E-PLUS WiFi |
| ProArt X670E-CREATOR WiFi |
| Prime X670E-PRO WiFi |
| ASUS B850 and B650E Motherboards |
| ROG Strix B850-E Gaming WiFi |
| ROG Strix B850-I Gaming WiFi |
| ROG Strix B650E-E Gaming WiFi |
| ROG Strix B650E-I Gaming WiFi |
Gettings started with DIMM Fit Pro
DIMM Fit Pro puts you in control with a with range of customization options. Here’s how to get started. Inside the interface in the UEFI, you’ll start by selecting the items that you’d like to include in the Fitting process. You can select up to twenty parameters related to memory overclocking. Select the targeted items by pressing Left Shift+F1, and enter yes when prompted. These items will be tested in the order in which you’ve selected them. To remove an item, select it and press Left Shift+F2. For best results, we recommend starting the list with the items that have the narrowest range of feasible values — in other words, the settings that can’t be adjusted very far without preventing your system from booting.
Once you have your list of parameters, you can enter the DIMM Fit Pro submenu and customize the fitting process further. Parameters that take an integer or floating-point input can be assigned a range, with the “Up” value indicating how much higher than the initial index the item will be allowed to go, and the “Down” value determining how much lower than the initial index it may be allowed to go. Please note that it is your responsibility to ensure that the range is within valid values. As you’re getting started, you might find it best to start with initial values based on settings that are known to work and then adjust from there.
The “Fail to Next” setting determines if the search on the current item should be aborted when worsening margins are observed as DIMM Fit Pro tests an item in a certain direction. It may fold back towards the other direction if that range has not been traversed yet, or onto the next item keeping the best value observed. If in doubt you can leave it at Disabled.
The “Selection Rules” option gives you control over how DIMM Fit Pro identifies what values to settle on for the memory overclocking parameters that you’ve selected.
- Deterministic + Worse Margins: An ideal setting for users who prioritize stability over absolute performance, this option enforces a deterministic and conservative validation procedure that selects values based on the worst margin observed in order to prioritize memory stability. This makes it less inclined to update an item’s value unless and until it has a healthy measure of certainty that the new value is stable.
- Deterministic + Total Margins: This setting is similar to the first, and should be preferable to users who prioritize stability, but decides based on the total observed margins, not just the worst margins observed, creating more opportunity for increased performance.
- Relaxed + Worse Margins: This setting only performs a basic memory test for stability, and decides based on worst margin observed if the test checks out, making it a compelling choice for users looking for a balance of performance and stability.
- Relaxed + Total Margins: This setting offers the potential for the greatest performance out of the available options, as it only performs a basic memory test for stability and makes its decisions on total margins observed.
You’re almost ready to run DIMM Fit Pro. Wrap up by selecting the number of loops for the algorithm to run. The optimized values will keep updating after every search on an item concludes, resulting in new starting points per iteration. If you’re not sure where to start, start with two loops. You can always continue where you left off anyway, so there’s no drawback to selecting a smaller value. Then, toggle DIMM Fit Pro to “Enabled,” and hit “Save and Exit.”
DIMM Fit Pro will start running at system boot. As you may have experienced with DIMM Fit in the past, there’s no video image during the process, and you’ll see system resets. Once it has finished, the memory overclocking parameters that DIMM Fit Pro was testing will be set to their optimal values. If you happen to stop the process mid-way, the current item on the search list will be set at its last tested value, which may not be an optimal setting, so it’s best to let things run until they’re done.
While DIMM Fit Pro does override the value of the target options you specify, it doesn’t automatically create a new profile. You might find it useful to save your settings into a profile so that you can quickly access them again later.
A streamlined pathway to optimized memory settings
The sheer customizability of DIMM Fit Pro makes it a perfect match for advanced users eager to fine-tune every detail of their memory subsystem. We’re as excited as you are to see what memory overclocking heights enthusiasts will be able to reach with DIMM Fit Pro and the latest DDR5 technology. Share your results with us on X, and feel free to join the conversation at the ASUS PC DIY Community to learn some tips and tricks from your fellow PC builders.