Why We Need The ASUS Thermal Control Tool
That begs the question: if we already have these mechanisms at our disposal, why do we need an additional software tool? Put simply, while we have core ratio options, voltage options for each core, and a way of locking applications to the favorite core, load-related voltage control is limited, which hinders overclocking in various ways:
- When using Auto mode for voltage control, adjustments are limited to applying a positive or negative offset to a pre-programmed voltage (VID) within the PCU.
- The PCU’s default VID for a given core ratio can be too high or too low, which means we have to apply an offset to correct it.
- Processor core ratios change on the fly, according to the workload; this results in the applied offset voltage having a different outcome for each core ratio.
- We can only apply a single offset value to each core, and that offset is applied to all of the ratios for that core.
Therein lies the rub. If 1.45Vcore is not enough for a 45X ratio (4.5GHz), and we apply a +30mv increase to net 1.48Vcore under single-threaded loads, when we fall back to a multi-threaded workload ratio of 42X, the +30mv increase is also applied there. In some instances, that extra +30mv can be enough to push temperatures into the throttling zone. A subtractive offset has similar issues; the only difference is that we end up with a given ratio not having enough voltage for stability.
Before you think about using alternative Vcore modes like Adaptive to get around this, don’t. Once we override Auto mode for Vcore and set a manual Adaptive voltage, it is applied to both our light and heavy load ratio targets, which means the CPU’s thermal output stays more or less the same – even if we apply the frequency change via the AVX offset parameter. Ideally, we need a method to define two different voltage levels for Adaptive mode; one for single-threaded, and the other for multi-threaded workloads. Unfortunately, no such control layer exists in hardware.
We touched on the CPU’s built-in throttling mechanism above; if the temperature breaches the CPU’s built-in thermal protection threshold – typically, 95 Celsius or greater – the CPU will throttle its frequency by reducing the processor ratio in steps. The usual result is an operating frequency of 3.7GHz or lower, depending upon the duration of the thermal breach. Temperatures will hover just below the throttle point when this occurs, which introduces some additional undesirables into the mix:
- Waiting for a CPU to reach the protective throttling temperature when overclocked and overvolted isn’t a good idea because elevated temperatures with high levels of current can induce degradation.
- If we rely solely on the throttling feature to downclock the system under heavy loads, we lose performance in multithreaded applications.
We’d prefer to avoid all of these situations… And that is a perfect segue to introduce the ASUS Thermal Control Tool. This utility works by monitoring temperatures and applying a user-defined ratio and voltage when the CPU reaches a specified temperature. On the flip-side, once the temperature falls under the user-defined threshold, the ratio and voltage are returned to original levels. Simple, but remarkably effective:
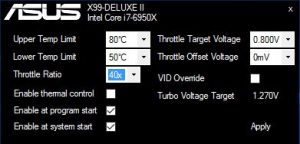
 The ASUS Thermal Control tool
The ASUS Thermal Control Tool is a lightweight, standalone application with a standard, 500-ms polling interval. This polling rate was chosen to avoid compatibility issues with other monitoring software, and to help keep DPC latency low.
We describe the role of each function, below:
Upper Temp Limit: This defines the high-temperature threshold. When the CPU package temperature exceeds this value, the multiplier ratio and voltage will change to the values defined in the Throttle Ratio and Total Throttle Voltage boxes.
Lower Temp Limit: Defines the low-temperature threshold. When the CPU package temperature is under this value, the core ratio and voltage will return to the UEFI-applied overclock.
Throttle Ratio: Defines the ratio that is applied when the temperature breaches the Upper Temp Limit setting.
Enable Thermal Control: When ticked, the Upper Temp Limit, Lower Temp Limit, and Throttle Ratio settings are active.
Enable at Program Start: When ticked, applies previous settings when the ASUS Thermal Control tool is restarted.
Enable at System Start: When ticked, automatically loads the ASUS Thermal Control tool when Windows is restarted.
Throttle Target Voltage: Sets the target voltage (Vcore) for the throttle ratio. Configure UEFI to Adaptive Mode for Vcore to use this option. The applied voltage needs to be sufficient for the throttle ratio.
Throttle Offset Voltage: Allows setting an offset voltage to Vcore for the throttle ratio. This setting works in conjunction with Throttle Target Voltage to change Vcore to the target value. For most users, this setting can be left at the default unless you prefer using Offset voltage rather than Adaptive (for whatever reason). Our preference is to utilize Adaptive voltage.
VID Override: When ticked, this overrides the current voltage mode and applies the settings applied in the Throttle Target Voltage and Throttle Offset Voltage boxes – but only when the Upper Temp Limit temperature threshold is breached. VID override is similar to setting a manual Vcore in UEFI.
Total Throttle Voltage: Shows the target throttle voltage (Throttle Target Voltage + Throttle Offset Voltage) for the throttle ratio. Pay close attention to this box before pressing the Apply button; the applied voltage should be suitable for the applied overclock and not too high for the cooling used!
Note: The CPU Package temp is utilized by the ASUS Thermal Control tool because it represents the average core temperature reported by the internal thermal sensors over a 256-ms period – this makes it a perfect choice for the task.

