

AMD’s third-generation Ryzen CPUs come loaded with intelligent management features that monitor a wide range of operating parameters to boost each core’s clocks as high as possible, whenever possible. Thanks to the smarts baked into the silicon, it’s easy to drop a third-gen Ryzen chip into one of our Socket AM4 motherboards and go. You’ll enjoy great out-of-the-box performance that automatically adapts to the power delivery capabilities and cooling capacity of your build. Enthusiasts are a different sort, though. We know that ardent PC DIYers want every last drop of performance from their systems. That’s why we’ve produced this Ryzen overclocking guide: to help you get the most out of your third-gen Ryzen PC.
You might wonder why you’d want to try your hand at overclocking. The answer is simple: to get more performance out of your PC, free of charge. In multithreaded apps where every second is of the essence, even modest performance increases can result in time savings that allow you to get your work done faster or do more work in the same amount of time. And extracting maximum performance from today’s competitive esports games often involves selecting and tuning the right memory kit to reach the highest RAM speeds and lowest latencies possible.
In this guide, we’ll explore how to optimize both CPU and memory performance for your third-gen Ryzen PC through overclocking. ASUS motherboards make overclocking easy and accessible. We offer a wide range of AMD Socket AM4 motherboards tailored to a wide range of use cases, but every board comes with firmware that exposes all the settings you need to get the best performance out of your components in a logical, clearly labeled manner. Helpful descriptions of many settings ensure that you know what a potentially unfamiliar parameter affects before you adjust its value.
To unlock the full performance potential of third-gen Ryzen CPUs, you’ll want one of our X570 motherboards. That platform is the only way to unlock the incredible bandwidth potential of the PCI Express 4.0 interconnect baked into third-gen Ryzen CPUs and the X570 chipset. You can consult our handy X570 motherboard guide to see which model is right for you, but you can rest assured that each board comes with the same award-winning and user-friendly firmware.
Laying the ground rules
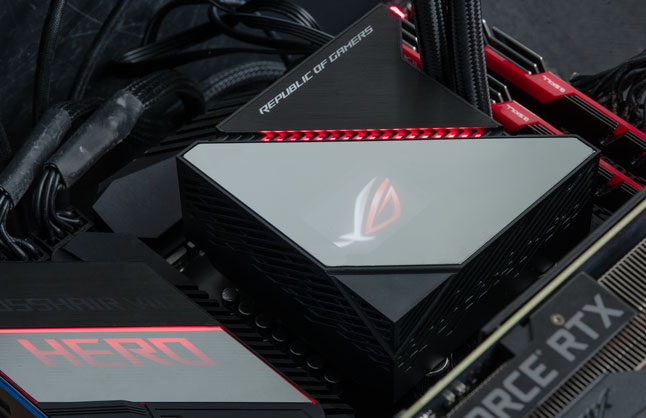
To explore the performance envelope of third-gen Ryzen CPUs and the X570 platform, I selected an ROG Crosshair VIII Hero (Wi-Fi) motherboard from our arsenal. This board boasts some of the most robust power-delivery circuitry and connectivity options you can pair with a third-gen Ryzen CPU, including an Intel Wi-Fi 6 AX200 adapter for the best performance with next-generation wireless networking hardware. Even if your parts list includes a power-hungry, high-core-count Ryzen 9 CPU, the Crosshair VIII Hero will provide that chip with the stable, reliable platform it needs to run at peak performance.
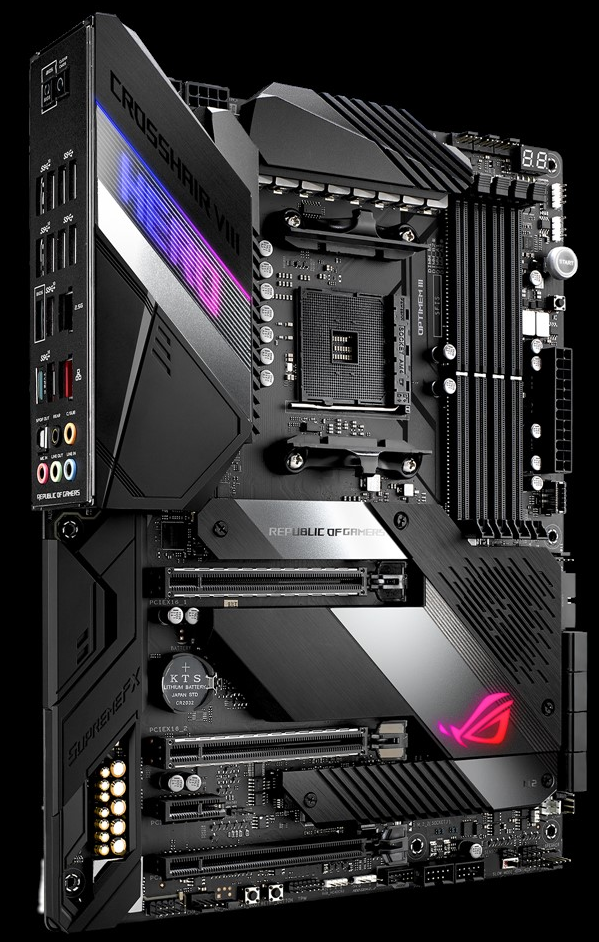
The Crosshair VIII Hero
I paired that motherboard with a Ryzen 7 3800X, the hottest-clocked eight-core CPU in the third-gen Ryzen family so far. To explore the limits of high-refresh-rate gaming on the platform, I paired that chip with a GeForce RTX 2080 Ti graphics card. Even at 1920×1080 and ultra settings, the RTX 2080 Ti is more than demanding enough to expose any CPU bottlenecks in games. I also used two 16GB dual-channel memory kits in my testing: one a G.Skill Flare X DDR4-3200 CL14 kit to represent third-gen Ryzen’s stock memory performance, and the other a G.Skill Trident Z DDR4-3866 kit to represent an attainable yet significant boost from stock memory speeds.
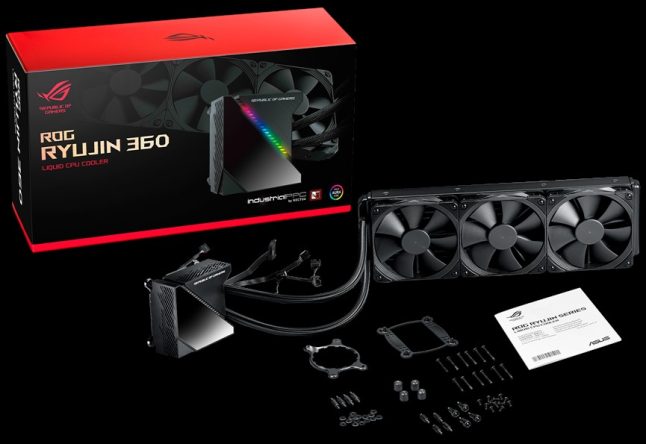
The ROG Ryujin 360 in all its glory
I topped off our Ryzen 7 3800X with an ROG Ryujin 360 closed-loop liquid CPU cooler to ensure that thermal headroom from the heatsink wasn’t a limitation in our testing. The Ryujin 360 works with Socket AM4 CPUs out of the box, and you don’t even have to set aside your motherboard’s Socket AM4 backplate to make use of it. The mounting standoffs for the cooler simply screw right into the existing backplate, making installation a snap. Beyond its sharp looks, the Ryujin 360 is primed to perform thanks to our partnership with Noctua. The cooler includes three NF-F12 iPPC fans chosen for their optimal airflow characteristics and enviable longevity.
Check yourself before you wreck yourself
Before we begin, keep in mind that even though the practice has become easier and more accessible than ever, overclocking is never 100% risk free. By operating hardware outside of its factory specifications, we are technically voiding the warranty of the CPU at a minimum. We’re also playing with parameters that have the potential to permanently damage a CPU if we’re not careful. Use common sense: increase your overclock in small, iterative steps for both frequency and voltage, keep an eye on CPU temperatures, and be sure to test stability every step of the way.
Computers at the heart of mission-critical or safety-critical workloads should never be overclocked. Running hardware outside of factory specs may silently introduce errors that affect the accuracy of calculations or data that might be related to the preservation of life, limb, or the bottom line. We can demonstrate that a PC won’t crash under a wide range of selected workloads, but no overclock should be treated as 100% stable. Be sure to weigh the performance you might gain against the consequences of a system crash at the wrong time, like during a game stream or a long 3D or video render job. These risks are remote, but if you need 100% guaranteed stability from your PC, it’s best not to overclock.
Ryzen to the limit
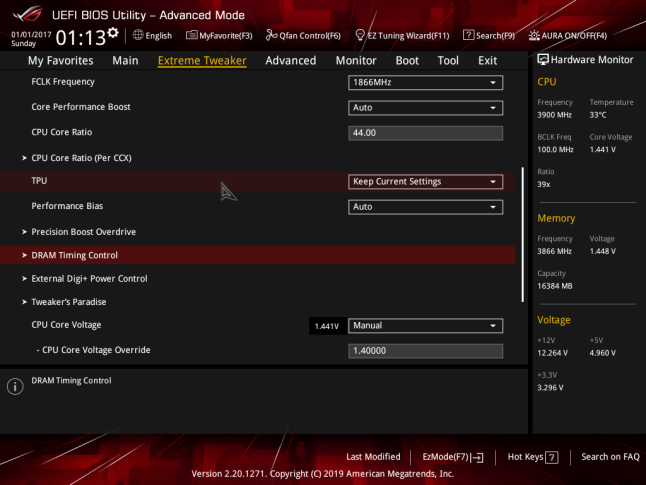
I started my overclocking expedition with the CPU. Third-generation Ryzen CPUs do offer a degree of automatic overclocking intelligence that can be enabled through AMD’s Ryzen Master utility, but using Precision Boost Overdrive and its Auto OC mode didn’t increase performance on my test bench. It seemed that Precision Boost 2 on the Ryzen 7 3800X was already taking full advantage of the beefy power delivery circuitry on the Crosshair VIII Hero and the cooling capacity offered by the ROG Ryujin 360. As a baseline, I observed 4.2 GHz all-core clock speeds from the 3800X under my Blender and Handbrake loads at stock settings.
If you’re a total newbie to overclocking, worry not: you can still join in on the fun without knowing Vcore from V-Bucks. Among its other tricks, our 5-Way Optimization utility—part of AI Suite 3 for Windows—has an automatic overclocking routine built in (thanks to our proprietary Turbo Processing Unit, or TPU) that employs the same iterative approach that seasoned tuners use. Unlike the prebaked, one-size-fits-all profiles you may find in other motherboard firmware, which might not apply optimal clock speeds or Vcore values for your setup, 5-Way Optimization can get you most of the way to an optimal overclock for your particular processor and system with the click of a button.
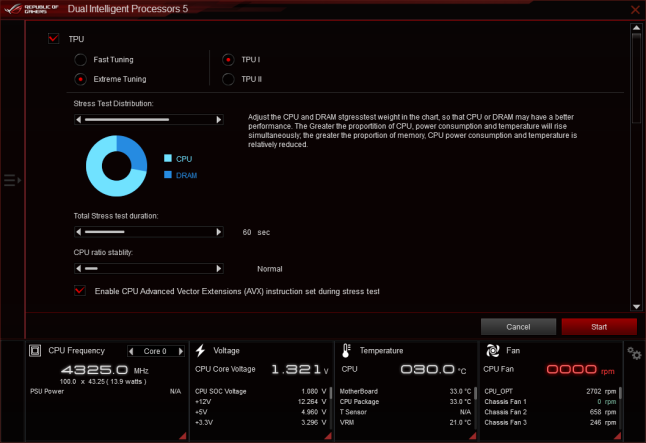
The TPU auto-overclocking routine gradually increases the amount of Vcore and slowly pushes up clock speed multipliers. As the utility overclocks your CPU, it runs an intensive stress test every step of the way. If you configure it to do so (and I recommend you do), the tool can stress test using the same demanding AVX instructions that the popular Blender and Handbrake applications employ for a configurable stretch of time. Those instructions give the SIMD units in modern CPUs a thorough workout by moving lots of data around, sucking down lots of power, and generating plenty of heat.
Once a stress test fails, your system will reboot, and AI Suite will present you with the last set of parameters it found to be stable. You can then choose to apply these settings for daily use or set every CPU parameter back to its default value, all within AI Suite.
Before setting out to find the maximum stable frequency for our chip through manual overclocking, I gave the TPU a crack at the Ryzen 7 3800X. I configured the utility to use AVX instructions and run a 60-second stress test at each upward step of clock speed and voltage. Even as an experienced manual CPU overclocker, I find that running 5-Way Optimization can save me valuable time, since it handles the process of iterating upward through each step of clock speed without any hands-on supervision. Even if it doesn’t achieve the highest possible overclock from a chip, 5-Way Optimization can get us within striking distance of peak performance.
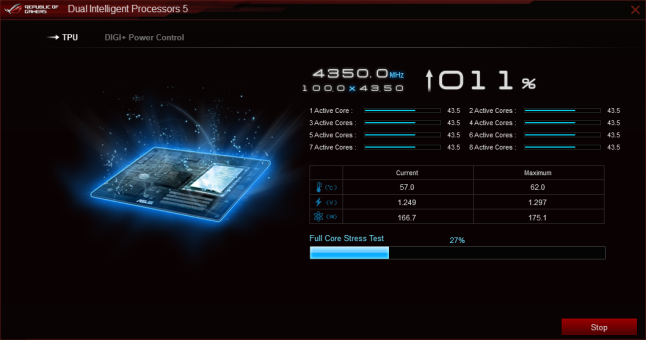
After 5-Way Optimization did its thing, my 3800X was running at 4.325GHz all-core at an observed 1.262V. To double-check the stability of these settings, I turned to ROG Realbench. Realbench uses a pre-configured collection of free applications, including the aforementioned Handbrake and Blender, to push a system to its limits using demanding workloads you’re likely to encounter in real life. Realbench makes it easy to run these applications as a stress test for long periods of time, and it has stability verification features that the apps themselves don’t. Two hours of Realbench is a good baseline for stability, and the settings that 5-Way Optimization settled on proved stable for this period.
Assuming direct control
To extract every bit of performance from my third-gen Ryzen chip, I still had to turn to good old multiplier overclocking, where we set a straightforward all-core overclock using the CPU core multiplier. Ryzen CPUs give us 25MHz steps to work with on the primary CPU multiplier, allowing for easy fine-tuning of overclocks if a given setting doesn’t prove stable.
Using this approach, I gradually increased all-core clock speeds and Vcore, checking for stability every step of the way using project files in Blender and Handbrake. To lock in my final settings, I ran the stress test in ROG Realbench for two hours and further tweaked Vcore to ensure stability.
Some folks might wonder about using Prime95’s Small FFTs stress test at this stage, as it’s well known for sucking down unparalleled amounts of power and generating massive amounts of heat. To be honest, I rarely employ Prime95 as an overclocking stress test any more. Huge amounts of current flowing through a CPU at high temperatures encourages electromigration, a phenomenon that causes the electrical components inside your processor to degrade and ultimately fail. As silicon lithography processes get finer and finer, my appetite for pushing staggering amounts of current through those incredibly tiny components gets smaller and smaller.
Prime95 Small FFTs puts a load on the CPU far beyond what even Blender and Handbrake can produce, so if you choose to go for “Prime stable,” you’ll have to dial in a lower clock speed ceiling and lower Vcore values than you will for Blender and Handbrake to ensure safe operating conditions. We favor tuning a chip for the most demanding real-world applications it’s likely to encounter, and Blender and Handbrake are among the toughest practical tests around.
Avoid core meltdowns
If you’re manually overclocking, you’re probably wondering how much Vcore is “safe” for your third-gen Ryzen CPU. Rather than offering a single prescriptive Vcore value as the maximum safe voltage—something we can’t do without testing hundreds of CPUs to failure—I’ll instead offer you a way of thinking about your processor’s lifetime as a function of its operating conditions. The more you increase the Vcore (and therefore the current flowing through the CPU), the more the processor will heat up under load. High operating temperatures greatly increase the likelihood of electromigration, and as we’ve already discussed, electromigration is the nemesis of casual overclockers looking for a long-term performance boost.
The Ryzen 7 3800X chills out beneath the Ryujin 360
The cooler you can keep your overclocked processor, especially under heavy load, the less severe the effects of electromigration are likely to be over time. Since voltage is the primary factor in power (and therefore, heat) dissipation for CPUs, we want to keep Vcore as low as possible for a given overclock and as low as we can, period. Even if you find that your chip can sustain a really impressive all-core frequency, it may take a huge amount of extra Vcore from the prior “step” of frequency to keep that overclock stable. CPU temperatures at high Vcore values may be quite high under load, increasing the likelihood of electromigration. You may also find that no amount of extra voltage is enough to keep a processor stable at a given frequency, even if load temperature isn’t a limitation. Once you’re running into those sheer thermal and electrical walls, taking even a small step back on frequency and voltage may still give you a practical overclock with much lower temperatures.
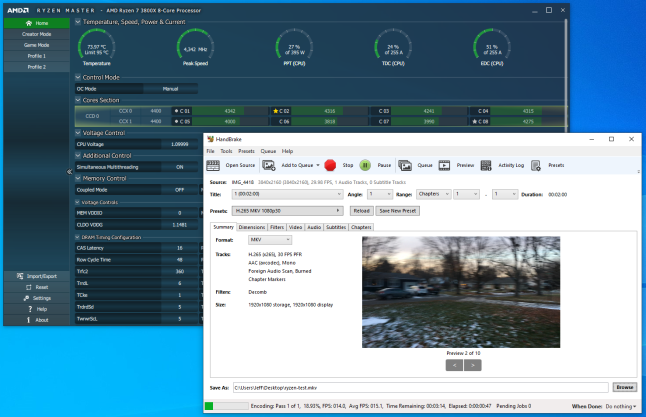
Stress-testing with Handbrake
For the Ryzen 7 3800X I have on hand, feeding even 1.4V or more into the chip wasn’t enough to make the CPU stable under my Blender and Handbrake loads at a 4.425GHz all-core clock speed. That Vcore setting pushed CPU temperatures into the mid-80º C range under those stress tests. 4.4GHz proved stable for two hours of Realbench at an indicated 1.337V, though, and CPU package temperatures topped out at about 73.5º C. You’ll note that manual overclocking only added 75 MHz to what 5-Way Optimization was able to extract, and we still needed a rather large step up in Vcore to get that last little bit of performance out of the chip.
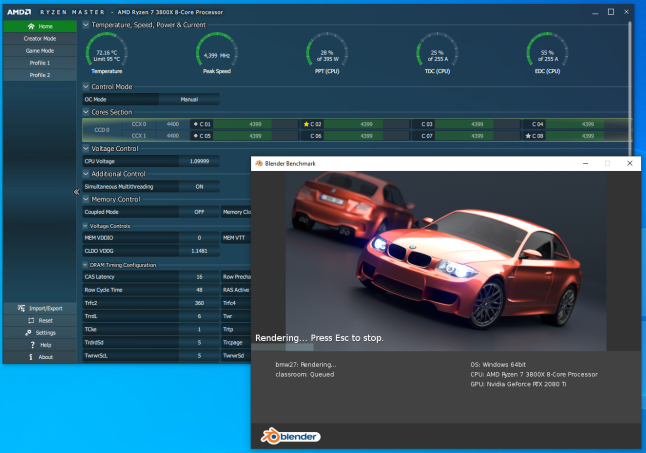
Stress-testing with Blender
All told, 4.425GHz was the point at which we were hitting the aforementioned electrical wall, and dialing back our frequency even a tiny bit let us use a much, much lower Vcore that produced much lower CPU temperatures—both factors that would make me more comfortable using these settings over the long term. The ROG Ryujin 360 lets us maintain those temperatures with low noise levels, too, thanks to its trio of excellent and effective Noctua fans. I only measured 36.5 dBA from my test bench under a Blender load.
Another hot topic around PC performance of late regards voltage regulator module (VRM) temperatures under heavy loads. Overheating VRM components can cause your CPU to repeatedly throttle as the VRM controller tells the CPU to slow down and let the power-delivery circuitry cool off. This throttling greatly degrades delivered CPU performance, so it’s something we want to avoid at all costs. All of our X570 motherboards use carefully designed VRMs with high-efficiency integrated power stages and massive heatsinks to prevent overheating.
Even with an overclocked eight-core Ryzen CPU on board, the Crosshair VIII Hero’s VRM barely breaks a sweat. I didn’t observe VRM temperatures greater than 41º C during my ROG Realbench test run at 4.4GHz—and that was a torture test with no airflow of any kind on the socket, a situation that shouldn’t occur in any well-designed PC case. VRMs usually don’t begin to throttle until components reach well over 100º C, so the Crosshair VIII Hero has tons of headroom to feed the 12-core Ryzen 9 3900X and upcoming 16-core Ryzen 9 3950X. To remove all doubt about VRM stability, you can also install an ROG Ryujin liquid cooler like I did and rest easy. Both the Ryujin 240 and Ryujin 360 have a quiet integrated fan on the pump head that moves air directly over VRM, SSD, and memory heatsinks to prevent any thermal-related instability. You can tune the behavior of this fan in AI Suite’s Fan Xpert 4 utility to get the exact balance of noise and performance you want, too.
Weighing the trade-offs
Since manually tuned Ryzen CPUs enter an OC Mode that disables Precision Boost 2 logic in favor of a fixed all-core multiplier, there’s a real concern about losing peak single-core performance when overclocking those chips. A stock Ryzen 7 3800X runs at a peak single-core clock speed of 4.5GHz. Our 4.4GHz all-core overclock traded a 2.2% decrease in peak single-core clock speed for a 4.8% increase in observed all-core clock speeds. That boost resulted in a roughly 5.4% decrease in the time it took to run my Blender benchmark and about a 4.7% decrease in total transcoding time for our Handbrake project. The JetStream 2 benchmark of single-threaded performance, on the other hand, lost just 0.9% of its score with our all-core overclock in place.
If every second matters in your productivity workloads, you might find that the small amount of extra performance you can get through all-core multiplier overclocking is worth it, but even CPU-bound games didn’t seem to benefit much from this effort on third-gen Ryzen chips. I saw practically no difference in average frame rates or 99th-percentile frame times from my game performance tests as a result of that extra all-core frequency.
Gentlemen, start your DRAM calculators
Next, I turned my attention to my test rig’s memory subsystem. Since the speed of the Infinity Fabric on-die and on-package interconnect on Ryzen CPUs is intimately linked with memory speed, overclocked RAM can have a significant effect on system performance.
To determine just how important RAM performance is to gamers using third-gen Ryzen CPUs, I ran through some real-world benchmarks of three games I know to be CPU-bound at high frame rates: Quake Champions, Grand Theft Auto V, and Hitman 2. By “CPU-bound,” we mean that a game’s performance is dependent on how fast the CPU can feed the graphics card work. The faster the main game code running on the CPU can tell the graphics card what to do, the higher the frame rate in these situations. With monster graphics cards like my GeForce RTX 2080 Ti, CPU performance is often the limiting factor in pushing frame rates to the max at lower resolutions.
I played through each of the three titles above at 1920×1080 and ultra settings. I recorded average frame rates and determined 99th-percentile frame rates (a value derived from 99th-percentile frame times, or the amount of time that 99% of frames took to render during our test run). 99th-percentile FPS handily describes “low” frame rates gamers are likely to observe in a title without considering the absolute worst-case frames that might have occurred only once or twice during a test run.
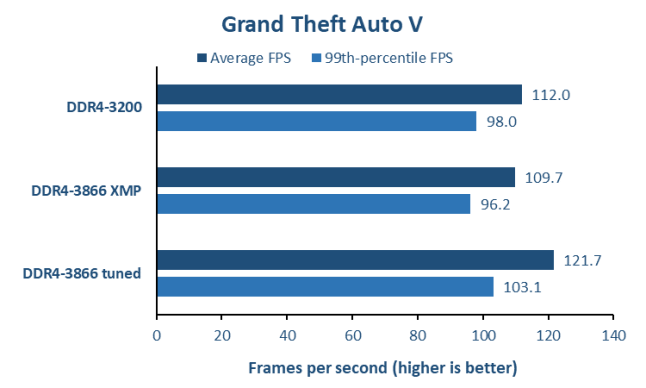
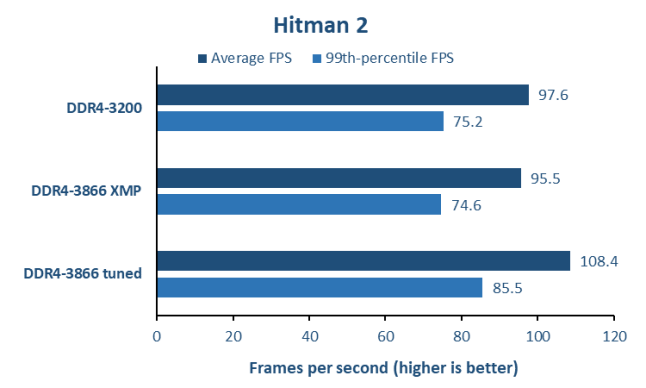
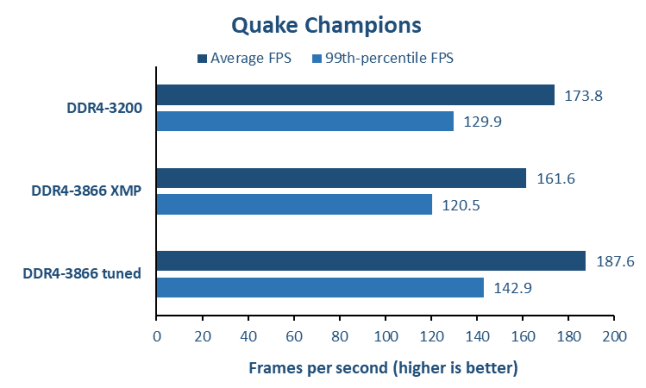
You’ll recall that my hot-clocked memory of choice was a DDR4-3866 kit, courtesy of G.Skill. I had expected to see a performance increase in games with this kit after applying its baked-in XMP settings, but I was in for a shock. Applying the prebaked XMP timings and voltages for that kit via our DOCP firmware option had a surprising result: game performance actually ended up a bit worse than my baseline test runs with my DDR4-3200 kit.
Whether that regression came down to straddling the crossover between 1:1 and 1:2 dividers for our Ryzen CPU’s Infinity Fabric clock with this memory kit, or whether it came from the relatively loose timings baked into the memory’s XMP profile, I’m not sure. Whatever the cause, it wasn’t what I wanted to see from a pricey pair of RAM sticks.
I knew from the enthusiast grapevine that tightening memory timings could have a big payoff for Ryzen performance, but I freely admit that I wouldn’t even know where to begin tweaking the dizzying range of memory sub-timings in modern motherboard firmware.
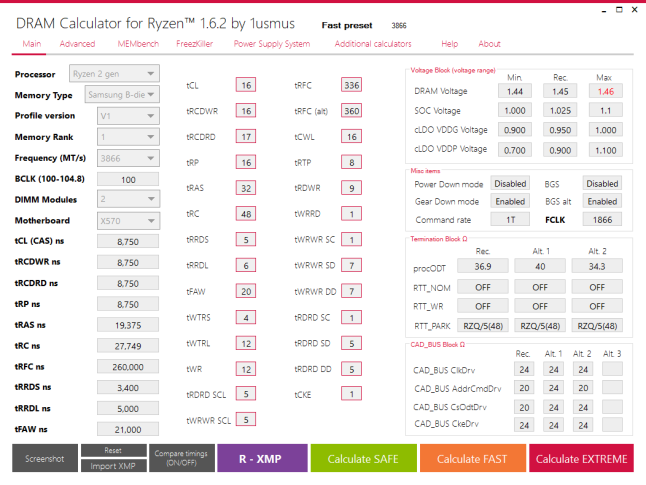
It turns out that with AMD processors, I don’t have to. Overclocker 1usmus has developed a handy tool for the community called the DRAM Calculator for Ryzen that does all the hard work for you. Import your memory’s XMP profile and provide some basic data about your system, and the DRAM Calculator for Ryzen will suggest detailed memory sub-timings and platform settings that you can then transfer to your system’s firmware.
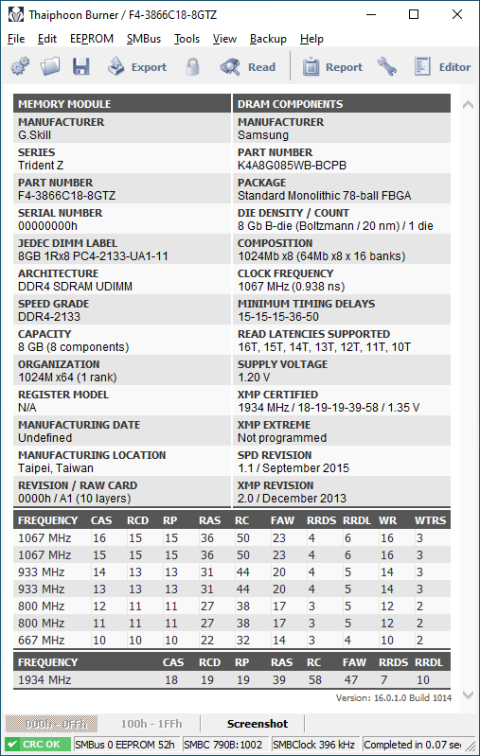
There is one bit of homework you may have to do to get useful numbers out of DRAM Calculator for Ryzen. The utility needs to know the manufacturer and type of DRAM chip that’s in your particular memory kit, and if you don’t have that information readily at hand, the free version of a utility called Thaiphoon Burner can read that data. Running Burner’s EEPROM -> Read SPD subroutine on my DDR4-3866 kit confirms it’s built using vaunted Samsung B-Die memory, a favorite of RAM overclockers the world over.
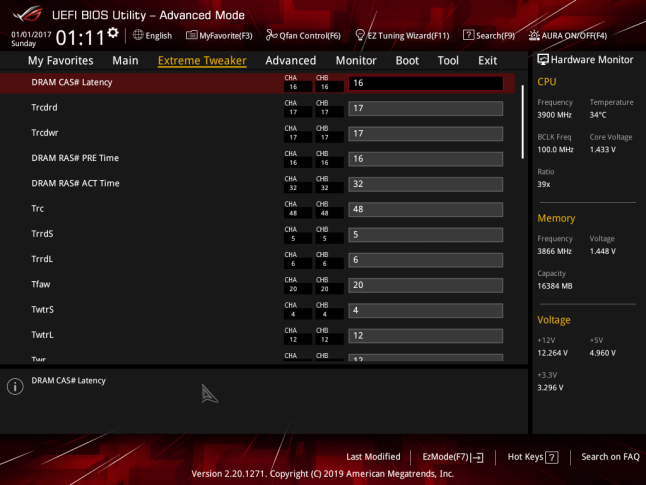
I took a photo of the resulting suggestions on my ROG Phone II and got to work porting those suggestions into my test rig’s UEFI.
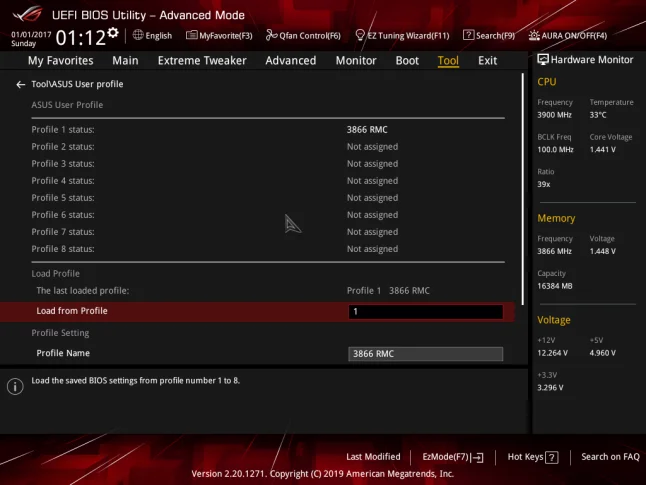
Our firmware makes it simple to apply these settings, and you don’t have to waste time entering them again if you’d like to swap among memory kits or set up configurations with or without a CPU overclock. Our Profiles feature lets you save up to eight complete snapshots of BIOS settings that can be recalled at the press of a key.
One word of warning: DRAM Calculator for Ryzen suggested running my DDR4-3866 kit at 1.45V to achieve stability with its suggested overclock. While this voltage isn’t likely to affect the longevity of the memory modules, it did get my RAM warm enough during Realbench stress testing that I felt more comfortable with a fan directed at the memory slots of the motherboard. The fan on the Ryujin 360 pump head also helped to keep air moving around the CPU socket and DIMMs. Be mindful of how much air is moving around the CPU socket in your system before pushing RAM voltages up too far, and don’t hesitate to direct airflow at your RAM if it starts getting toasty to the touch or you notice instability.
As you can see in the graphs above, applying the suggested settings from the DRAM Calculator for Ryzen produced noticeable improvements in gaming performance compared to stock memory. Each of the three games I chose as benchmarks enjoyed substantial increases in average FPS and reductions in 99th-percentile frame times. Those improvements translate directly to a smoother, more fluid gameplay experience. If you’re using a G-SYNC variable-refresh-rate monitor like the 165Hz ROG Swift PG279Q on my test bench, those boosts mean your display can run closer to its peak refresh rate, too—another direct and tangible improvement to the gameplay experience.
As with our CPU overclock, you’ll want to ensure that your memory overclock is stable using an empirical stress test. There are a variety of memory testing tools out there that can automatically do this job for you, ranging from Windows 10’s built-in memory diagnostic to bootable disk images like Memtest86+. If your DRAM Calculator for Ryzen settings aren’t stable, 1usmus has written an in-depth guide on further tuning the utility’s suggested settings for stability.
Overclocking for fun and profit
My dive into optimizing third-gen Ryzen CPUs on the X570 platform suggests two possible paths for overclockers to follow. Fast, well-tuned memory kits produce tangible gains in performance for high-refresh-rate, CPU-bound gaming, but they don’t have meaningful effects on the vast majority of creative or productivity workloads. Productivity performance can be enhanced a bit by overclocking the CPU, but those clock speed increases don’t translate into perceptible gains in FPS in the heat of battle. You can obviously overclock both the CPU and RAM, but choosing a fast, low-latency memory kit and optimizing its sub-timings should be priority one for maximizing high-refresh-rate gaming performance.
If you choose a memory kit that goes beyond third-gen Ryzen CPUs’ stock supported speeds, you should absolutely run the DRAM Calculator for Ryzen utility and give its suggested settings a try. You may find that you get a much better high-refresh-rate gaming experience this way than through applying XMP settings alone. We’re not just talking about synthetic benchmark improvements here, either—if your game of choice is CPU-bound, the wrong memory settings might produce worse performance than a stock memory kit would.
Folks who are constantly churning through CPU-heavy workloads, like rendering, video transcoding, or code compilation, may find that overclocking third-gen Ryzen chips delivers small but meaningful performance improvements in those tasks. If you’re saving a few seconds here or a minute there, that time will add up over hours, days, and weeks of work.
No matter what approach you choose, you’ll find that getting the best performance out of your third-gen Ryzen CPU is a breeze on our X570 motherboards. For beginning overclockers, the automatic overclocking routine in AI Suite 3 for Windows can get you most of the way to the optimal CPU overclock with the click of a button, making it easy to dip your toe in. For manual tuning, clearly-labeled and easy-to-understand menus make finding and tweaking the right settings fast and pain-free. Up to eight full settings profiles let you store your hard-won CPU and memory overclocks in a flash, saving you time if you want to compare the performance of different configurations before settling on a final setup. And well-designed, well-cooled VRMs won’t let your CPU down in the heat of battle, whether you’re running six or sixteen cores. Optimize your ASUS-powered third-gen Ryzen PC using the steps above, and you’ll know firsthand why our motherboards are the best around.