

There are many factors to consider when you’re planning out a new gaming PC build. If performance, reliability, and budget-friendliness are at the top of your list of priorities, then our TUF Gaming components are well worth your attention. Their focus on military-grade reliability and rock-solid fundamentals make these parts perfect for your next build, and thanks to our partners in the TUF Gaming Alliance, you can build a new PC using nothing but TUF Gaming components. Doing so provides the peace of mind that comes with knowing that your components will not only work together seamlessly for years to come, but they’ll share the same unique visual aesthetic for a completely harmonious build.
AMD’s Ryzen CPUs have proven worthy options for DIY PC builders ever since they hit the market, and the launch of third-generation Ryzen CPUs last year has made AMD builds all the more enticing. The price-to-performance ratio of both third-gen Ryzen CPUs and Navi GPUs makes them enticing for both budget and enthusiast builds alike. That’s why I’ve decided that it’s the perfect time to showcase our TUF Gaming line in our latest custom build.
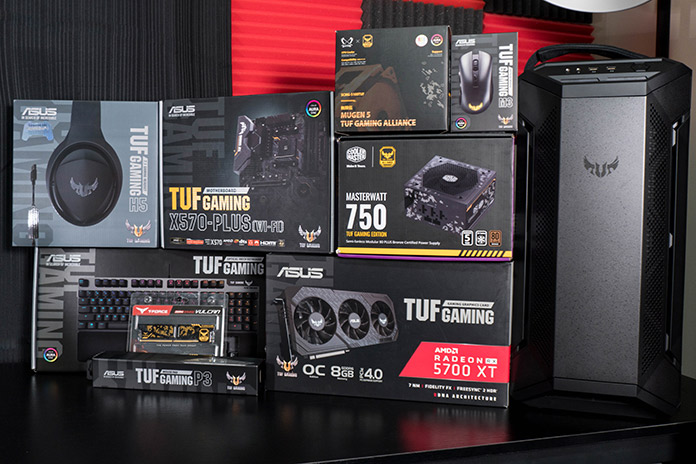
The goal for this new build was to create an all-TUF PC that can tackle today’s games and showcase the power of the latest Ryzen and Navi chips using our TUF Gaming X570 Plus (Wi-Fi) motherboard and TUF Gaming X3 Radeon RX 5700 XT OC Edition graphics card. Our TUF Gaming GT501 case offers effective cooling and plenty of room for powerful components, too.
Since playing at 1440p with high refresh rates seems to be the real sweet spot for PC gaming right now, it’s also the perfect time to show off our TUF Gaming VG27AQ monitor. The VG27AQ is a 27-inch 165Hz 1440p display with our exclusive ELMB Sync technology to keep your frames looking smooth and blur-free, even when you’re not hitting a consistent 165 FPS.
To build a gaming rig with as many TUF Gaming parts that meet the requirements as possible, I called on a few members of the TUF Gaming Alliance to aid us. Cooler Master, Team Group, and Scythe answered the call, supplying us with everything I needed to complete this build.
TUF Gaming Alliance, assemble!
The TUF Gaming Alliance is a collaboration between ASUS and more than a dozen manufacturers of premium PC components such as memory, storage, coolers, power supplies, and cases. Each component that bears the TUF Gaming Alliance badge has passed a series of tests showing that it conforms to our rigorous compatibility, stability, and durability standards.
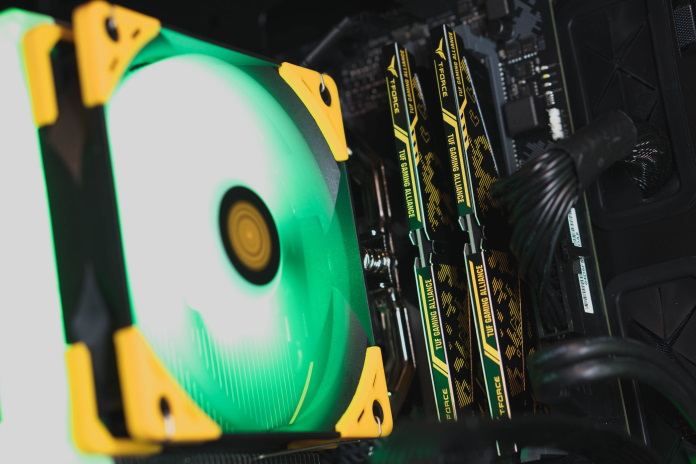
For this build, I used a motherboard, graphics card, case, and components from our in-house TUF Gaming line, which I’ll dive into shortly. This left me with a few holes to fill to round out the new gaming rig. For my RAM and storage needs, I turned to Team Group, who furnished us with 16GB of their T-FORCE Vulcan DDR4 and one of their T-FORCE Cardea Zero Z440 1TB NVMe PCI Express 4.0 drives, both of which bear the TUF Gaming Alliance badge. The Cardea Zero drive was crucial for this build, as my X570 motherboard supports the latest PCIe 4.0 standard, allowing us to unlock some of the fastest expansion slot bandwidth available.
Cooler Master answered our call and supplied us with their MasterWatt 750 TUF Gaming Edition power supply, which will be more than enough to power our rig while matching the rest of the build’s aesthetic. Finally, Scythe sent us their Mugen 5 SCMG-5100TUF Cooler to keep my CPU running cool and quiet as I tackle my foes in virtual combat.
The only component that isn’t a part of the TUF Gaming Alliance is the CPU. I used an AMD Ryzen 5 3600X 6-core processor that’s more than capable of keeping up with the latest games at my preferred resolution of 1440p.
Leading the way with X570
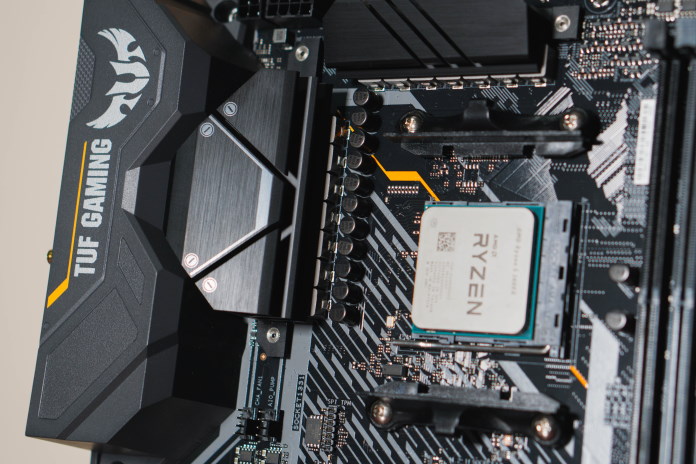
Each component that makes up a new PC build requires careful consideration. When I’m building a new rig, I usually select a cornerstone piece that I plan my build around. For this build, that would be the TUF Gaming X570-PLUS (Wi-Fi) motherboard. Not only does it allow us to use the latest third-generation AMD Ryzen CPUs, but it also unlocks support for blazing-fast PCIe 4.0 speeds at an affordable price.
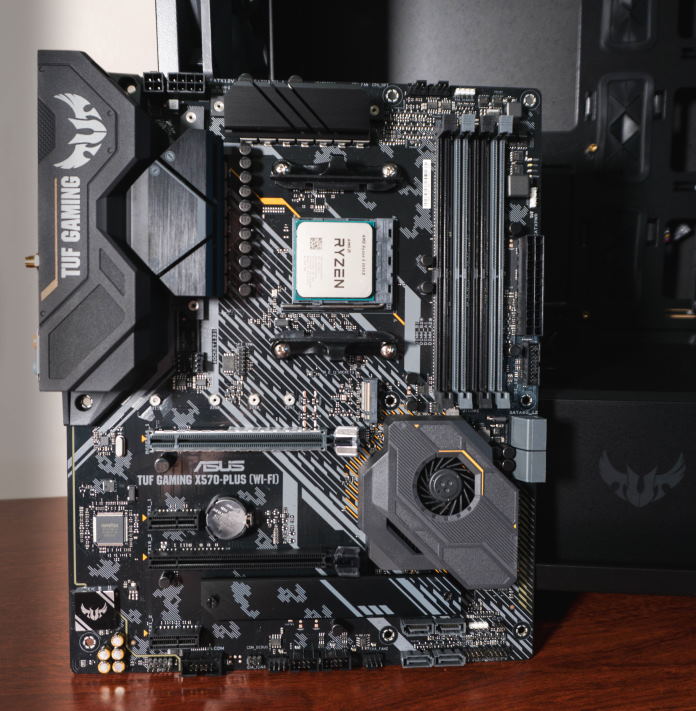
The TUF Gaming X570-PLUS (Wi-Fi) features a futuristic military-inspired paint job that gives off an aura of strength and durability. We back that impression by engineering this board with military-grade components to deliver rock-solid performance. The X570-PLUS (Wi-Fi) uses our TUF capacitors, which have 20% higher thermal tolerances than more traditional ones commonly found on a consumer motherboard.
The CPU VRM uses a 12+2 topology of DrMOS power stages combined with our TUF chokes to deliver the clean power and high efficiency that our AMD processor will need to perform at its best, even under sustained heavy loads that might cause lesser VRMs to throttle back CPU performance to prevent themselves from overheating. Massive heatsinks on top of this circuitry add another layer of assurance for sustained performance over time.
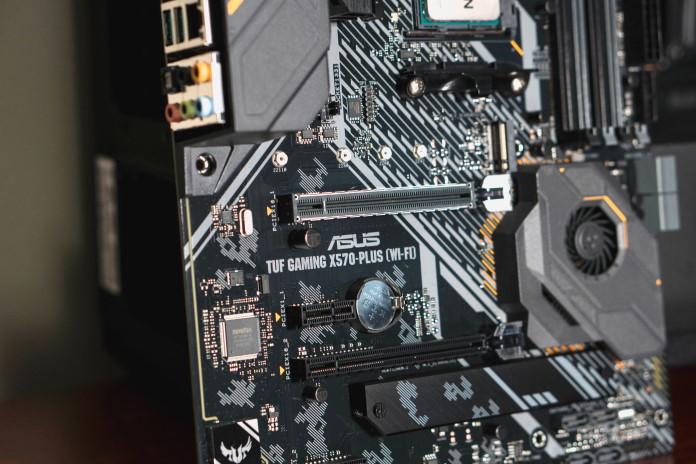
The 6-layer PCB design used in the TUF Gaming X570-PLUS (Wi-Fi) helps move heat away from critical components, which can be nice to have if you decide to overclock your third-gen Ryzen build. The primary PCIe slot uses our SafeSlot technology to keep your graphics card sitting snugly in place. SafeSlot minimizes the risk that you’ll harm your motherboard when moving a fully assembled PC around, especially with a beefy graphics card like the TUF Gaming X3 Radeon RX 5700 XT inside
Features like our TUF LANGuard protect against outside threats to your rig. LANGuard uses signal-coupling technology and surface-mounted capacitors to protect your components against damage from lightning strikes and static electricity.
When it comes to connectivity, the TUF Gaming X570-PLUS (Wi-Fi) has everything we need for our current build, with some room for future connectivity as well. The two PCIe 4.0 X16 slots are perfect for taking full advantage of AMD’s latest graphics cards, while the pair of M.2 PCIe 4.0 ports offers compatibility for the fastest SSDs on the market. Gigabit Ethernet, integrated Wi-Fi 5 and Bluetooth support, a host of USB ports, and Aura Sync support round out a feature set that makes this the perfect motherboard for my midrange 1440p TUF Gaming build.
Powered by AMD
Since my motherboard uses the X570 chipset, I needed to use one of the latest Ryzen CPUs from AMD to unlock its full potential. Since the primary focus of the build is gaming at 1440p while keeping an eye on our budget, I settled on the Ryzen 5 3600X.
The 3600X is a 6-core, 12-thread CPU with a base clock of 3.8GHz and a boost clock of up to 4.4GHz. The single-thread speeds are more than enough to keep up with any game that I throw at it, while the extra cores and threads are perfect for handling your Twitch stream, voice chat, music, and other applications you might be using as you play.
While I decided to keep everything running at stock speeds for this build, the X570 platform offers some headroom if I determine later that I want an extra boost. If you want to learn how to overclock your own Ryzen build, then check out our guide to overclocking third-gen Ryzen CPUs on the X570 platform.
RDNA in its blood
AMD delivered a great one-two punch with the release of their third-generation Ryzen CPUs and Navi-based GPUs, so it made sense to keep this an all-AMD build when selecting the graphics card. The Radeon RX 5700 XT is a tough GPU to beat in terms of price and performance and should be more than capable of powering my 1440p monitor at high refresh rates.
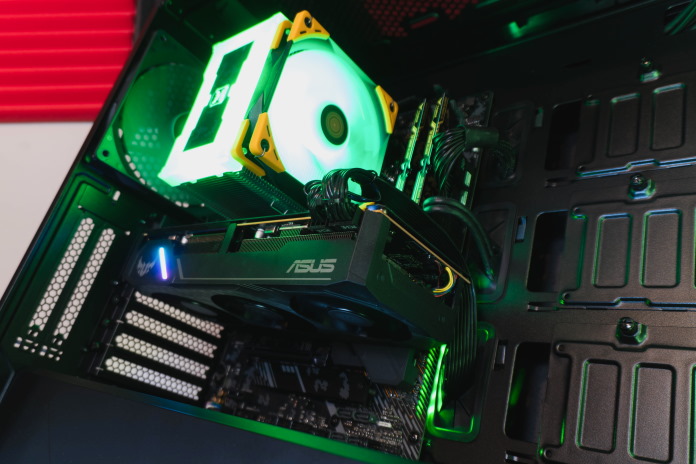
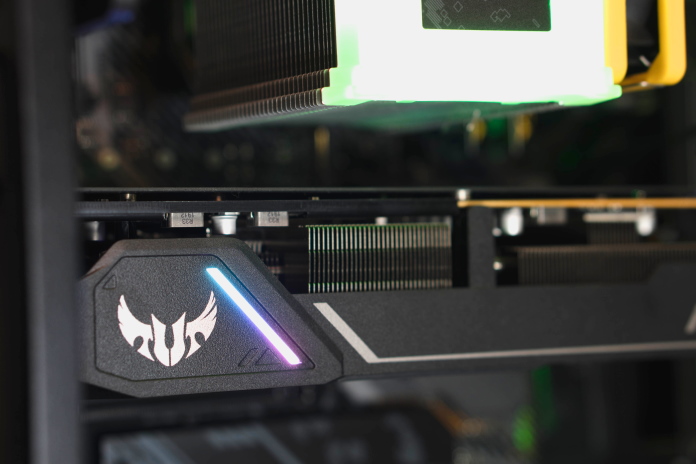
Our TUF Gaming X3 Radeon RX 5700 XT OC Edition card is the latest addition to the TUF Gaming GPU line and fits perfectly in my build. This GPU packs 40 RDNA compute units and 2560 stream processors running at a boost clock speed of 1980 MHz to pump out up to 9.75 TFLOPS of compute performance. It also features 8GB of dedicated GDDR6 memory running at 14GT/s.
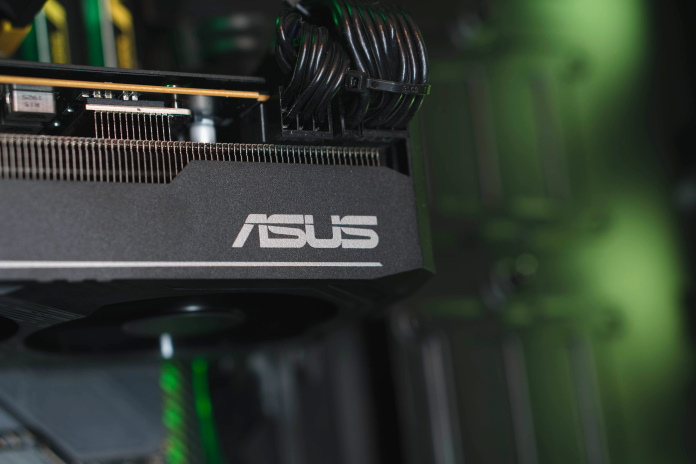
Just like all TUF Gaming components, my GPU of choice stands out from the rest of the pack thanks to its rugged design and expert engineering. The TUF Gaming X3 Radeon RX 5700 XT OC Edition contains three powerful sleeve-bearing fans that use space-grade lubricant and feature IP5X dust resistance to keep the card running cool for years to come. The extra-large 2.7-slot cooler perfectly matches the military-inspired design on my TUF Gaming X570-PLUS (Wi-Fi) motherboard. Even the aluminum backplate used to reinforce the card against sagging bears the same distinctive motif.
PCIe 4.0 brings unparalleled speed
One of the most exciting parts about building a new PC around an X570 motherboard is its support for PCIe 4.0. Currently, the X570 platform is the only consumer chipset that supports the latest PCIe standard. While this will become important for graphics cards in the future, the latest NVMe drives are able to break new speed records today thanks to the increased bandwidth of PCIe 4.0.
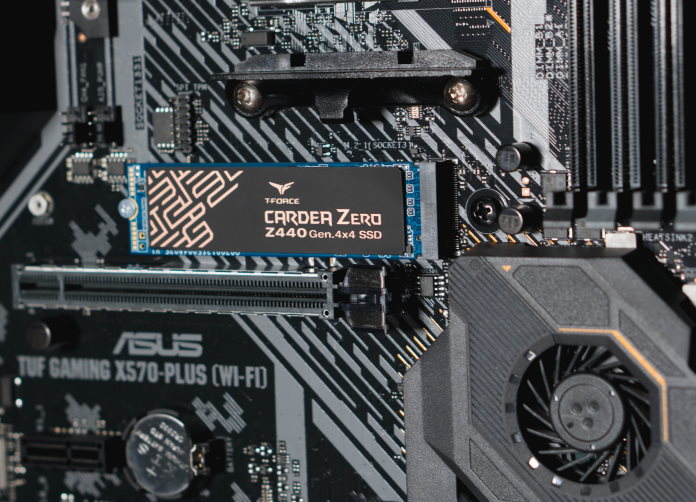
I reached out to TUF Gaming Alliance partner Team Group, and they supplied me with their latest T-FORCE Cardea Zero Z440 drive. The Cardea Z440 in my system is a 1TB NVMe PCIe SSD, and its top speeds blow away any other SSD I’ve used. Team Group says that the drive is rated for read speeds of up to 5,000 MB/s and write speeds of up to 4,400 MB/s. A quick check with CrystalDiskMark showed that the Cardea Z440 is more than capable of hitting those speeds, even after loading it down with several rather large games.
My TUF Gaming X570-PLUS (Wi-Fi) motherboard has two PCIe 4.0 M.2 slots, one of which has a built-in heatsink. Since the T-FORCE Cardea Zero Z440 will be reading and writing data at extremely high speeds, I installed it in this slot to help dissipate any heat that might build up otherwise.
By now, I’m sure at least one person has wondered what they could do with that second PCIe 4.0 M.2 slot. While you could always put in a slower drive for storing files that don’t need the blazing-fast speeds unlocked by PCIe 4.0, that’s hardly pushing the envelope. If you want to achieve some of the fastest read and write speeds possible, you can use that second slot to install an identical drive in a RAID 0 configuration. If you’re curious about what kinds of speeds can be achieved in this configuration, then I’ve got a little treat for you later.
Thanks for all the memories
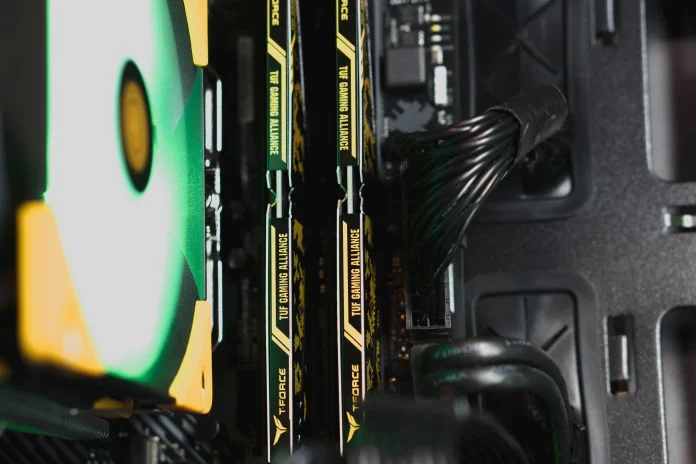
Team Group not only answered my call for storage, but they also provided us with the memory that we need for this build. They sent over a 16GB kit of their T-FORCE Vulcan DDR4 TUF Gaming Edition RAM that perfectly matches the aesthetic of my build. The heat spreaders on both sticks have the same military-inspired pattern found on our other components, as well as a TUF Gaming Alliance badge to show your allegiance. The Team Group T-FORCE Vulcan memory kits come in a variety of speeds up to DDR4-3600, all of which pair well with third-gen Ryzen chips.
Power up
My Ryzen 5 3600X and Radeon RX 5700 XT need plenty of power to unlock their full potential, which is precisely why I reached out to our partner Cooler Master for one of their MasterWatt 750 TUF Gaming Edition power supplies. Not only does the exterior bear the same military-inspired motif as our other TUF Gaming Alliance components, but it offers semi-fanless operation and modular cabling that makes it a perfect fit for this build.
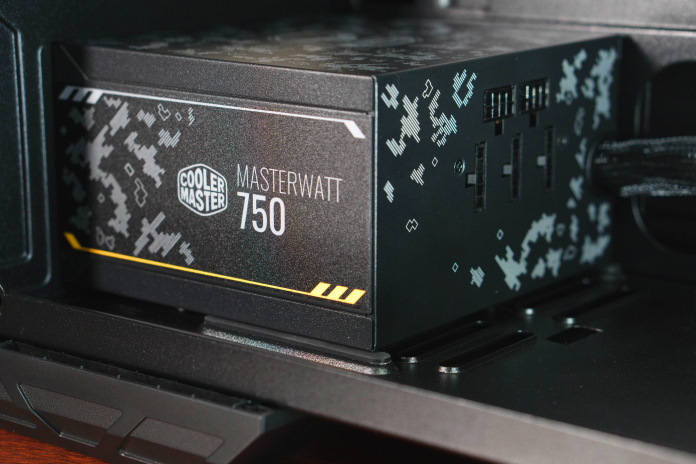
This intelligent 750W power supply uses one of Cooler Master’s quiet, dust-resistant Loop Dynamic Bearing fans when it’s under load, but converts to silent operation whenever the PSU is under 15% load. When it does have to spin, it uses a gradual fan curve to keep the unit cool while still keeping the noise to a minimum. The modular cabling feature is always appreciated when building a new PC, as it reduces the number of power cables that have to be routed and hidden away. And the fewer cables you have, the more room your case has for airflow.
Keeping cool under pressure
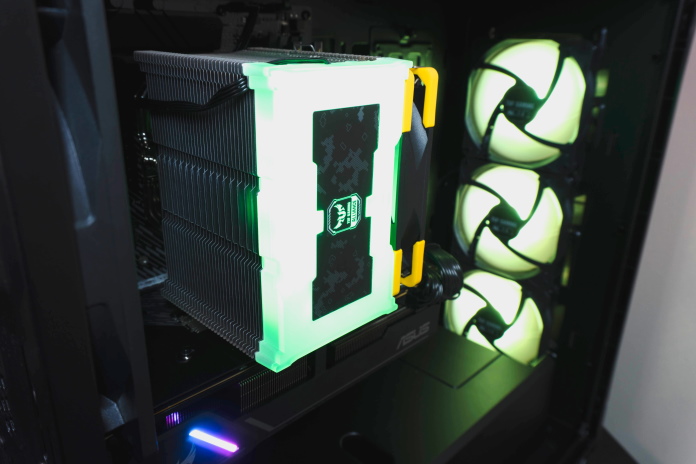
The Ryzen 5 3600X that I selected for this build comes with a capable stock cooler, but I wanted something a little beefier so that I have a bit of headroom should I decide to overclock in the future. Plus, AMD’s cooler doesn’t come with the all-important RGB lighting that I want for the build.
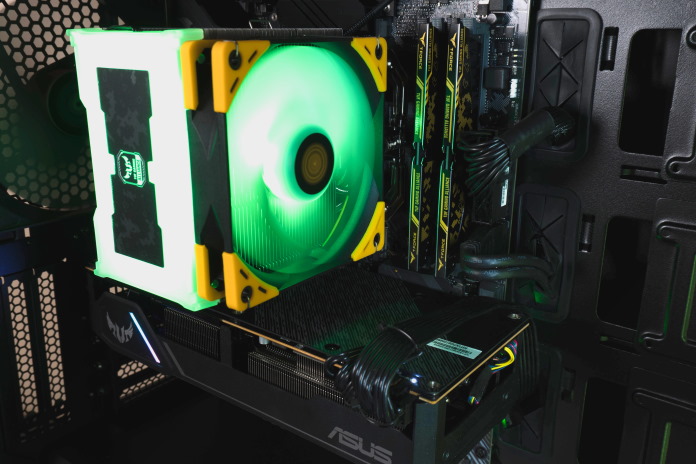
Our partners at Scythe have the perfect air cooler for my build: the Mugen 5 TUF Gaming Alliance CPU cooler. Like all TUF Alliance components, it bears the same logo and accents that keep the rest of my build looking consistent and rugged. The Mugen 5 cooler uses an asymmetrical design that offsets the heatsink and fan towards the rear of the case. This allows for maximum use of the space while still keeping all four memory slots accessible.
Both the Kaze Flex 120 self-contained liquid bearing fan and the translucent heatsink shroud are equipped with Aura Sync-compatible RGB lighting so I can match it with the rest of the build.
Greatness enclosed
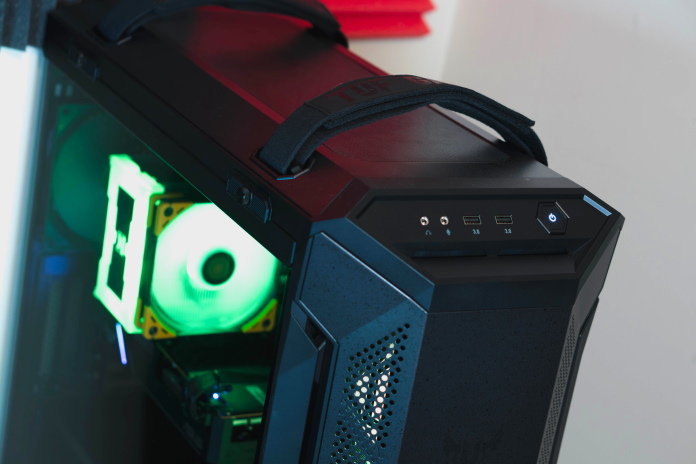
Since I’m building an all-TUF PC, there’s no better chassis to package it in than our own TUF Gaming GT501 mid-tower case. Even without the TUF logo emblazoned on the face, the sturdy steel construction and angular design make it instantly recognizable as a part of our military-inspired line. The mid-tower size has more than enough space inside for all of the components I’ve selected with lots of room to spare for airflow and cable routing.
Three high-flow 140mm PWM fans with Aura Sync-compatible RGB lighting come installed at the front of the chassis, along with a rear 140mm exhaust fan to keep air flowing smoothly. There’s plenty of room along the top of the case for three more fans, plus room for radiators as long as 360mm at the top or front.
Since no one wants to see cables dangling in their PC, the GT501 has a 30mm gap behind the motherboard tray to keep everything out of sight. The PSU shroud runs along the bottom of the case to both hide away unsightly power cables and keep air flowing more efficiently in the case by separating the PSU from the other components.
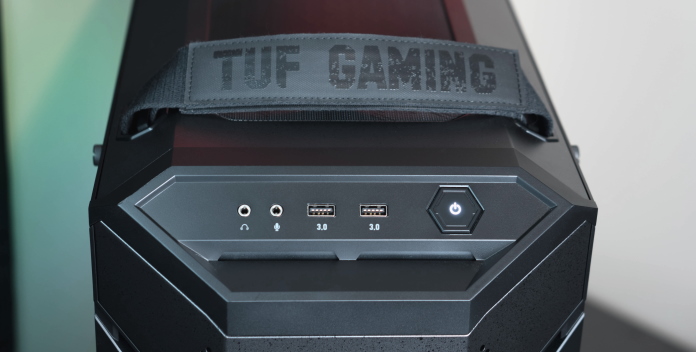
A smoky tempered glass pane showcases the components inside of my build and softens the brightness of the RGB lighting just a little. Two woven cotton handles adorn the top of the case, making it easy to move around a room or when transporting it to LAN parties.
Life looks good at 1440p
Since I’m targeting 1440p gaming on this build, the TUF Gaming VG27AQ is the perfect display to complement it. The 27” IPS panel is capable of refresh rates as high as 165Hz for those wanting to compete at the professional level—or those simply seeking the smoothest visuals possible.
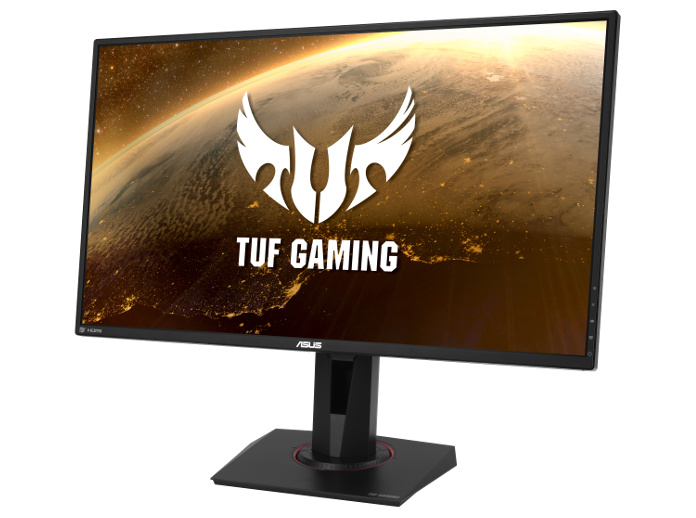
Merely having a monitor capable of high refresh rates isn’t enough to keep your games looking buttery smooth under all circumstances. To create the best gaming experience possible, the VG27AQ combines two visual technologies into one great taste that we call ELMB Sync.
The first element of ELMB Sync is Extreme Low Motion Blur (ELMB) backlight strobing. ELMB turns your monitor’s backlight off quickly between every frame, ensuring that each individual frame is presented clearly, much the same way CRT monitors used to. This strobing also ensures that the Moving Picture Response Time is an incredible 1ms.
The second element of ELMB Sync is the variable refresh rate (VRR) support. Variable refresh rates ensure that your game continues to look smooth when the frames the GPU outputs fall out of lockstep with the refresh rate of your monitor operates without the judder and potentially higher input lag of Vsync. ELMB works best when the graphics card is delivering frames at 100 FPS or higher. The VG27AQ’s refresh rate can go as low as 40Hz and as high as 165Hz, meaning as long as your game doesn’t drop below 40 FPS, it’s going to look crisp and smooth thanks to ELMB Sync.
The TUF Gaming VG27AQ doesn’t just ensure that your picture is crisp and smooth, but also that your colors look vivid and faithful. It covers 99% of the sRGB gamut and has a contrast ratio of 1000:1. The wide 178-degree viewing angles ensure that even if someone is watching you game off to the side, they’re still going to see the same beautiful image you do.
Rounding it out
No build is complete without the peripherals that connect you to it. For my keyboard, mouse, mousepad, and headset, I pulled from the arsenal of our latest TUF Gaming devices.
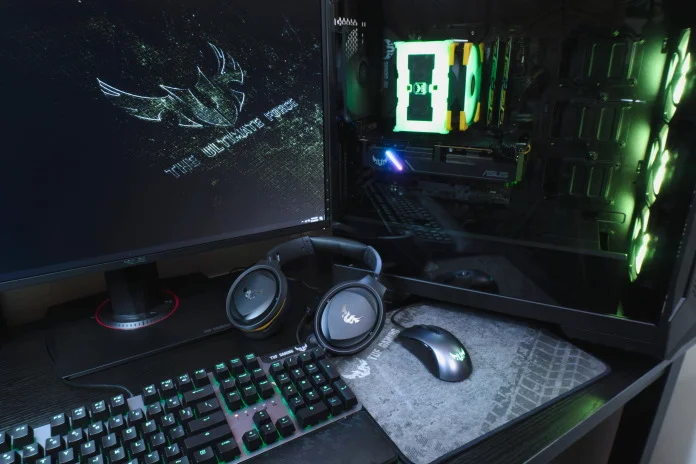
The TUF Gaming K7 keyboard has a frameless floating keycap design that keeps its footprint quite small, even when used with the included black leatherette wrist rest. The aircraft-grade matte aluminum plate that makes up the base looks perfect sitting near the GT501 chassis and continues the military-grade look of the build. The per-key Aura Sync RGB lighting is capable of a variety of effects, though to match the rest of my build, I set the keys to TUF Gaming green.
Our TUF Gaming M3 mouse is an ambidextrous affair with a gaming-grade Pixart 3325 optical sensor. A pair of customizable buttons sit in their usual place on the left side of the mouse and are perfect for assigning weapons or abilities for quick activation in-game. You can easily adjust your sensitivity by cycling through one of four custom settings up to 7000 DPI by using the two buttons just below the scroll wheel. The TUF Gaming logo on the rear of the mouse is equipped with Aura Sync compatible RGB lighting to match the rest of the PC.
The mouse rests on one of our TUF Gaming P3 mousepads to really tie the whole build together. The durable pad uses a smooth textile-weave surface that lets your mouse glide over it with ease. The tire tread design matches the military-inspired aesthetic of the rest of my build, while anti-fray stitching keeps the edges intact through years of battle.
Good audio is essential to your immersion and communication while you’re gaming. To handle my audio needs, I enlisted the TUF Gaming H5 headset. The stainless steel headband provides a rugged look and feel while keeping the weight of the headset down. Each ear cup contains one of our 50-mm Essence drivers for rich sound quality, and the detachable analog boom mic ensures that your teammates can hear you loud and clear.
It’s all coming together
One of the benefits of using parts from the TUF Gaming Alliance is that there’s little worry when it comes to compatibility. All products that bear the TUF Gaming logo are guaranteed to be compatible to create peace of mind when picking out the components for your next build. Also, as you’ve no doubt noticed through the course of this build, the individual TUF Gaming components feature the same military-inspired aesthetic, assuring that your pieces will come together to form a cohesive look.
Selecting your components and knowing that they’ll work together in harmony is just one part of the build process. Assembling a PC might seem like a daunting task, but TUF Gaming Alliance components are designed to make the process of PC building as easy as possible, even for relative newcomers to the PC DIY scene.
The GT501 chassis is a rather spacious mid-tower design that provides a lot of room to work with. While case size is generally determined by the size of the motherboard and the space you have for the tower, larger cases make installing components much easier than with a smaller one.
Since I didn’t have to worry about cramped conditions or carefully fitting large components into a tight space, the assembly process went smoothly. Once the motherboard was in, the rest of the components went into place with ease. As with all coolers, my Scythe Mugen 5 CPU cooler did require a small amount of assembly. This mostly consisted of replacing the existing bracket on the motherboard with their custom solution. A large cutout in the GT501’s motherboard tray made this installation a snap, as I could easily manipulate the screws and brackets from both sides of the board.
Generally, with such a large cooler, I would have to insert the memory before or during the CPU cooler installation. However, because of the clever asymmetrical design of the Scythe Mugen 5, none of the memory slots were obstructed, and I had the option to install my DIMMs at any point during the build. More importantly, I can access the remaining slots to add additional sticks of RAM in the future.
Once I installed the components, it was time for the task of routing and hiding all of the cables. Cable management on this build was particularly easy for several reasons. The first was the generous 30cm of space behind the motherboard tray, where I arranged all of my wires. The PSU shroud was a welcome feature that I’ve not used in a build until now. Since the power supply is hidden away and the shroud runs nearly the entire length of the case, there’s plenty of room to hide bulky power cables from view. The modular Cooler Master MasterWatt 750 ensured that I didn’t have too many cables to hide, as I only installed the ones I needed.
The use of M.2 drives instead of SATA drives made the cable management process that much easier. Since my only storage drive is connected directly to the motherboard, it eliminates the need for messy cables. Let’s be honest: no one enjoys having to find ways to hide a power cable and data cable for each 2.5” SSD.
After I completed the assembly of the components and installation of Windows, the only thing left to do was set up our suite of ASUS software to take full control of the system. Armoury Crate handles everything from driver updates to Aura Sync lighting effects and fan control. I’ll go into that a little later.
Gaming in the real world
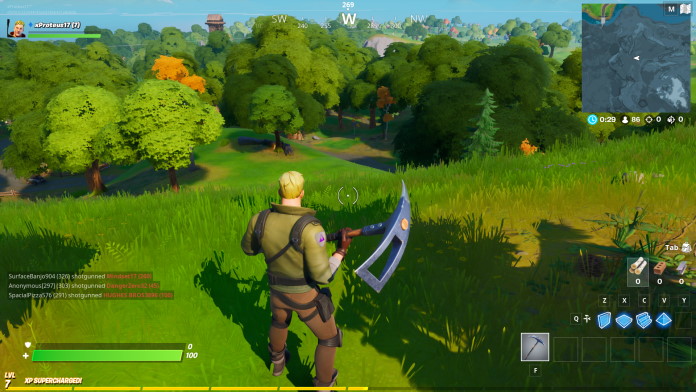
My TUF Gaming build looks great, but as the old adage goes, “it’s what’s on the inside that counts.” I specifically planned for this PC to play the latest esports games with high refresh rates at a target resolution of 1440p. As expected, it handled every game I threw at it with ease.
Titles like Rocket League, Overwatch, and Fortnite are optimized for high-refresh-rate gaming, so they were the first ones I loaded up on my TUF build. As expected, I was able to crank the settings up to their highest on both Rocket League and Overwatch while still maintaining frame rates of around 144FPS and above while sticking to my screen’s native 1440p resolution. I was able to hit those same frame rates in Fortnite by using the “High” presets in-game.
Apex Legends is a bit more demanding than the aforementioned titles, but I was still able to max out the graphics settings while keeping solid frame rates in the 120FPS range. PlayerUnknown’s Battlegrounds is the most graphically demanding game in my battery of tests, but I was still able to stay over 100FPS by using a mix of High and Medium settings in-game. Those who play competitively know that there are a few settings that can be turned all the way down if you want to achieve the maximum FPS, but I like to keep a balance of visual fidelity and high refresh rates when I game, which my TUF build was more than able to provide.
Since I selected the TUF Gaming VG27AQ for my monitor, I’m able to take advantage of ELMB Sync to make my games look crisper and smoother than they would on another display. I targeted competitive titles that are meant to be played at high refresh rates, which are perfect for showcasing the strobing effects of ELMB Sync. I spend a lot of time playing Rocket League at 144Hz on my personal gaming rig, so I was impressed to see how much clearer the fast-paced motion appeared on the VG27AQ, even when playing at the exact same framerate. The advantages of ELMB Sync were even more noticeable in games like Apex Legends or PUBG where the framerates were still high, but dipping below the monitor’s maximum output, as they take advantage of the variable refresh rates allowed by ELMB Sync.
Playing at high refresh rates means pushing almost any system to its limits, which can generate a significant amount of heat. Using the default settings, my TUF rig is able to stay cool without creating too much noise during most games. However, using our Fan Xpert 4 software, it’s easy to set up a custom cooling profile that behaves exactly how you want it to. You can manually adjust each fan’s curve so that it ramps up its speed exactly how you want it to when gaming. If you’re overwhelmed by the available options, don’t worry, our automatic Fan Tuning software can create four customized profiles based on your current fan placement.
Rather than spending a lot of time customizing my own fan curves and profiles, I went ahead and used the automatic Fan Tuning option. This set up four profiles that I could easily switch between using the software itself, or the optional Fan Xpert overlay. These are Silent, Standard, Turbo, and Full Speed.
I ran the system in Silent mode whenever I wasn’t gaming, and it lived up to its name. Certain fans would stop spinning altogether, creating a whisper-quiet environment. I rarely needed to kick things up to Turbo or Full Speed, as the Standard setting was enough to keep the system running cool even under load.
Fun with RAID 0 and PCIe 4.0
For all intents and purposes, my build only uses a single SSD for storage. However, Team Group actually sent us a matching pair of their T-Force Cardea Zero Z440 drives to use. After I completed all of my other tests, I decided to do what any hardware enthusiast would do when offered a pair of matching ultra-fast drives: I installed both of them in a RAID 0 configuration for maximum performance.
If you’re unfamiliar with RAID (short for Redundant Array of Independent Disks), it’s a method of combining multiple drives to increase speed or reliability. RAID 0 uses two or more drives (preferably of the same size and model) in tandem, both to double capacity and to achieve the fastest read and write speeds possible. It accomplishes this by splitting the data evenly between each drive, taking advantage of the combined speed of both drives. The technology is a bit more nuanced, but you can imagine how much faster two drives working together would be than a single drive.
The process of setting up the RAID 0 configuration on the TUF Gaming X570-PLUS (Wi-Fi) was simple and straightforward. You can find the full instructions here, but I simply enabled NVMe RAID mode in the UEFI BIOS and used the RaidXpert2 Configuration Utility to create the array. I selected RAID 0 and confirmed that I wanted to use the two M.2 NVMe drives, and left the rest of the options on their default settings.
After a restart, I needed to install Windows, which included one extra step that’s required when booting from a RAID array. When selecting the boot drive to install Windows on, I had to use the “Load driver” function to install our RAID driver. I found the driver on the support page for the motherboard and simply included it on my Windows installation flash drive. After loading the correct driver, everything about the installation completed as usual.
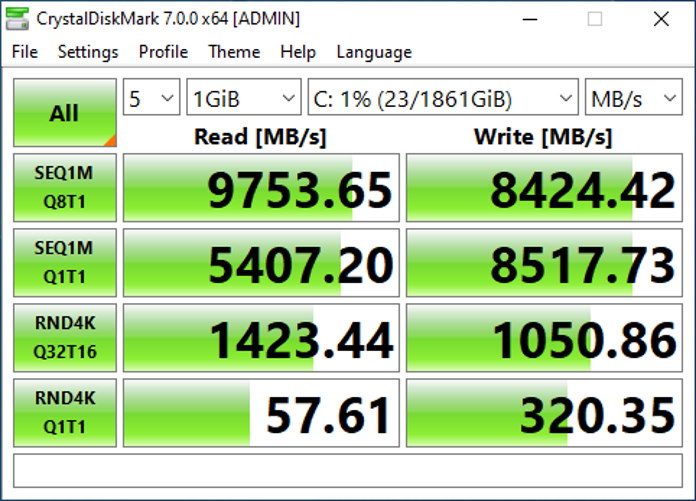
Once Windows was installed, the PC functioned almost identically to how it did with the single drive, with two notable exceptions. First, the two 1TB drives appear as a single 2TB drive. Second, and most importantly, the read and writes speeds are considerably higher. While synthetic tests on RAID arrays can provide varying results, my tests showed that we were able to achieve speeds almost twice as fast as the single drive produced.
It’s worth noting that there are plenty of reasons to consider a RAID 0 configuration, along 04with a number of risks involved. One of the biggest downsides to a RAID 0 configuration is that failure of a single drive will result in complete data loss. However, the greatly increased read and write speeds I observed make it very tempting for those who want the absolute fastest I/O bandwidth possible.
Better together
From start to finish, building a TUF Gaming Alliance PC was simple, straightforward, and enjoyable. And best of all, the end result is a wholly coordinated gaming station that will turn heads just as easily as it tackles the latest games. In the end, my PC consisted almost entirely of components from the TUF Gaming Alliance, which is what made it so easy to assemble a powerful rig with a coordinated aesthetic throughout.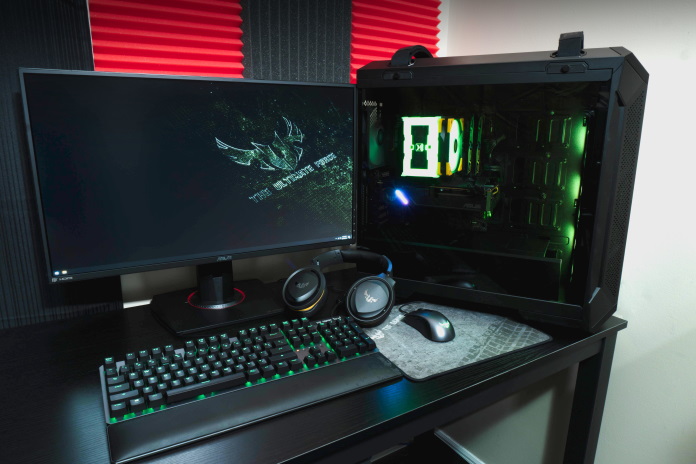
Starting with the TUF Gaming X570-PLUS (Wi-Fi) motherboard and focusing on AMD’s latest Ryzen and Radeon chips, I was able to assemble a machine that is more than capable of tackling the latest esports titles at high refresh rates on a 1440p display. Thanks to the power of ELMB Sync on our 27” TUF Gaming VG27AQ display, every game looks extra crisp and smooth, whether you’re getting frame rates as low as 40FPS on a super-demanding title, or all the way up to 165FPS on games like Rocket League. And thanks to PCIe 4.0, I was able to push read and write speeds to new heights, with plenty of headroom for future improvements across all PCIe lanes.
Once again, we’d like to extend our thanks to Cooler Master, Team Group, and Scythe for helping make this build possible, as well as to the rest of our TUF Gaming Alliance members for creating an ecosystem built on compatibility, stability, and durability.