

Cell phone cameras have come a long way in the last decade. Though we were on the cusp of the smartphone era in 2007, the majority of phones were still only capable of capturing low-resolution photos. Transferring them off your device was a hassle, and the quality usually wasn’t good enough for printing. The pictures existed only on our phones. If you wanted to take photos worth sharing, you needed to bring your “proper” camera.
Ten years on, advancements in mobile technology have seen our phones all but replace point-and-shoot cameras. They’ve also completely changed our attitude towards photography. We’re taking more photos than ever, and apps like Instagram and Snapchat serve not only as conduits for sharing, but also as inspiration and motivation to take better shots. Just capturing the moment isn’t enough anymore. Every photo, no matter how mundane the subject, has to be worthy of framing or sharing.
In the quest for well exposed and perfectly composed photos, the ability to control certain parameters, like exposure and shutter speed, goes a long way. But that type of control is mostly found in pricier point-and-shoots and DSLRs. Smartphone cameras are far more limited in their controls, but they’re also much more portable. And so it goes: our desire for more control clashes with the convenience of a camera that’s charged and within arm’s reach at all times.
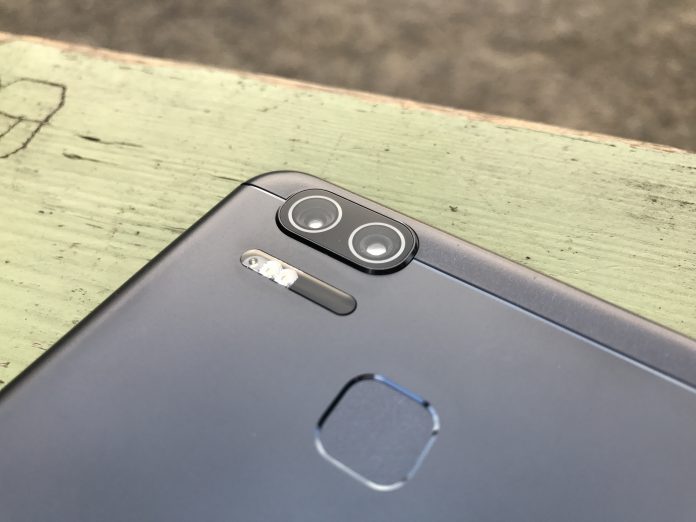
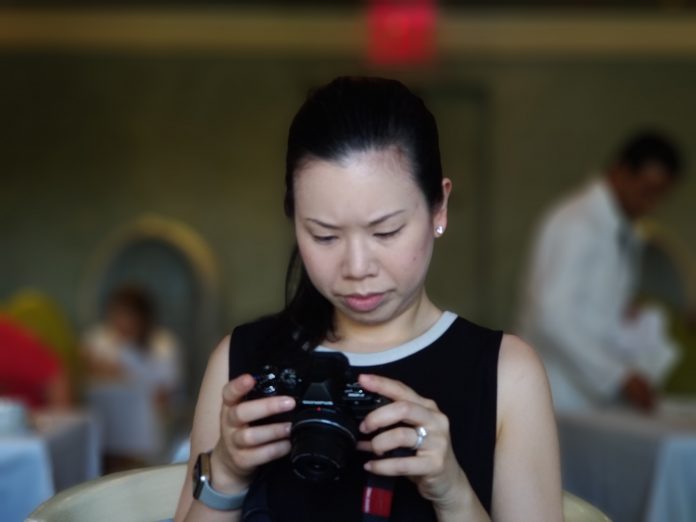
The ZenFone 3 Zoom was designed for smartphone users starting to feel the limitations of point-and-shoot photography, but unwilling to invest in a completely separate device just to get the shots they want. With dual cameras, 2.3X optical zoom, optical image stabilization, and manual controls for ISO, white balance, shutter speed, and more, the ZenFone 3 Zoom’s camera gives you the kind of functionality usually reserved for high-end cameras without the burden of an extra device.
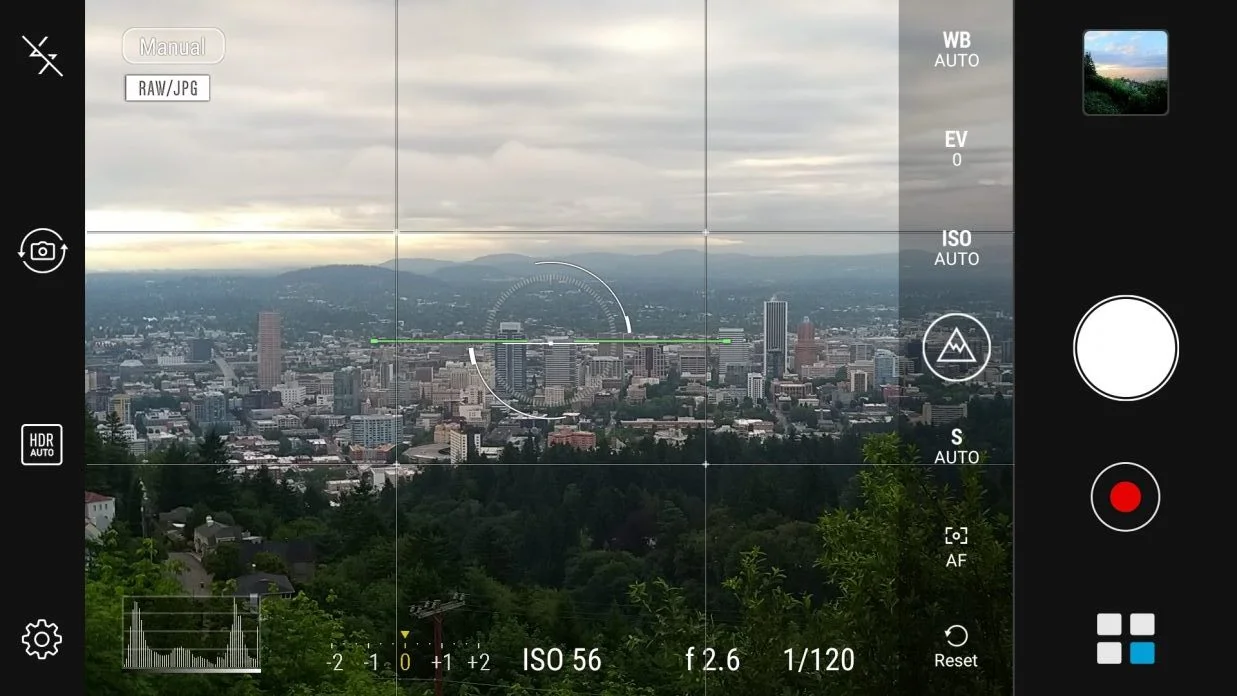
Manual mode can be a pretty scary prospect for the uninitiated, but the ZenFone 3 Zoom makes light work of learning the ins and outs of shooting in manual. Even if you have no interest in learning how tweaking the ISO or changing the shutter speed can improve your pictures, there are 18 other shooting modes dedicated to helping you capture the best shots with just one tap. Here’s how to get the most of the ZenFone 3 Zoom’s camera, from Manual mode to your own modified version of Auto. If you’re looking for instruction on a specific mode, click on any of the modes below to jump to that section.
- Auto and modified Auto
- Optical zoom
- Night mode
- Auto HDR and HDR Pro mode
- Portrait mode
- Manual mode
- RAW
- Time Rewind
- Smart Remove
- Children mode
- Timelapse mode
- Miniature mode
- GIF mode
- Slowmo mode
- Super Resolution mode
- Selfie Panorama mode
- Beautification mode
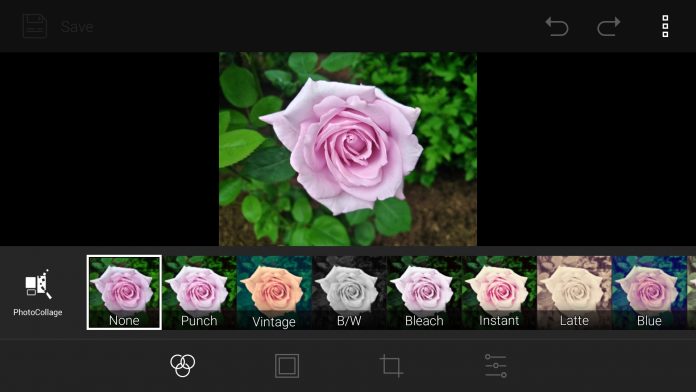
- Filters
Getting started
Auto is the default setting when you launch the camera app, but it’s also the best place to start tweaking if you’re a little apprehensive about digging right in with Manual mode. It does all of the heavy lifting with white balance, ISO, exposure, flash, and even HDR, though you can still control the experience to some extent. Hit the gear in the top left to visit the settings menu and start exploring how to modify the Auto defaults.
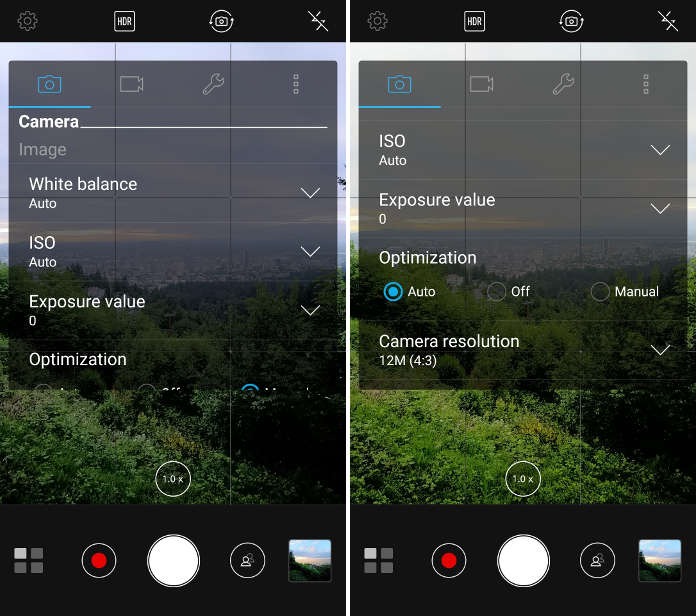
First, you’ll probably want to change the camera’s default resolution. Out of the box, you’ll be shooting 8MP 16:9. I changed mine to 12MP 4:3 just in case I want to print my photos at some point (might as well use the whole sensor, and I can always crop later on). You can also opt for 8MP 4:3 or 6MP 16:9 to save space.
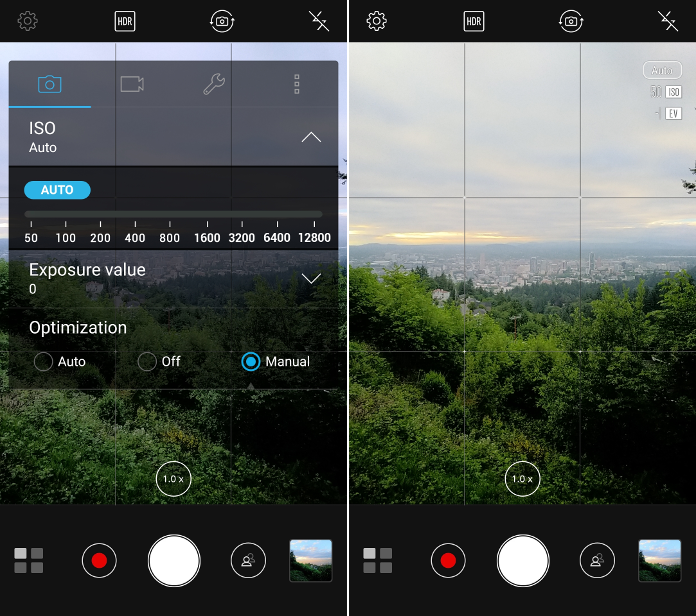
The settings menu is also where you’ll be able to override Auto’s decisions for ISO, white balance, and exposure. This is super handy if Auto lets you down consistently because of the challenging environment you’re in (say a dark restaurant or a wickedly sunny day at the beach). You can modify ISO or white balance, and those changes will “stick” until you revert back to Auto for each of them. A little on-screen indicator shows what you’ve fiddled with as you’re shooting and serves as a handy reminder if you plan to go back to the defaults later on.
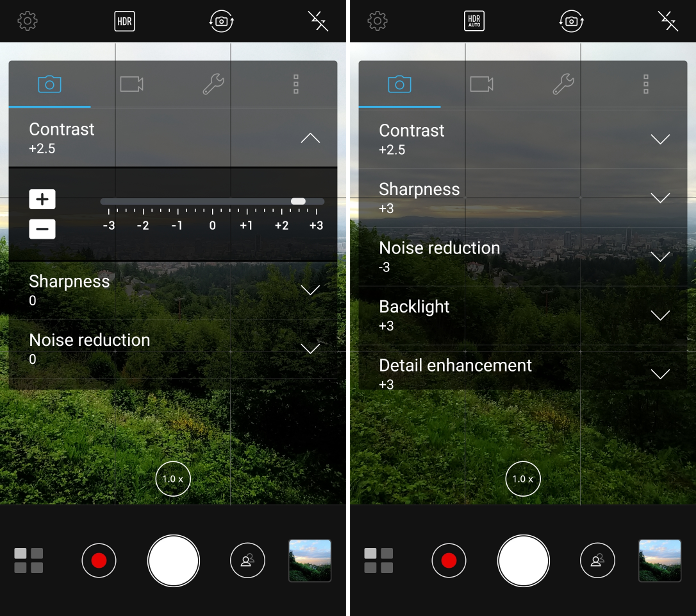
You can also tweak certain aspects of the default shooting mode based on your preferences. When it comes down to it, photography is subjective, and what I like in my photos is not necessarily the result you want in yours. Without going full manual, the ZenFone 3 Zoom lets you customize the default shooting mode. Again, hit that little settings gear in the top left and scroll down to Optimization. Set it to Manual, and you’ll have the ability to alter saturation, contrast, noise reduction, sharpness, backlight, and detail enhancement.
While it might seem extreme to modify the default shooting mode, a lot of people have a clear idea of their style or brand of photography, and will consistently boost saturation and sharpness after the fact (like with Instagram’s more in-depth edit functionality). If you find you always jack certain settings before sharing, this allows you to eliminate that step. Note that these settings will stick until you toggle Optimization back to Auto. No indicator will appear on screen for these changes, and it’s easy to forget you’ve made them (especially if they’re just subtle tweaks). If you launch your camera and things look funny, check to see if you’ve got some forgotten Optimization tweaks festering in the settings menu from a previous session.
Auto produces reliably good results in a broad range of environments. Outside of bright sunlight, daytime shots rarely require manual intervention, and Auto puts forth an admirable effort adapting to low-light situations, drafting help from the dual-tone flash if it’s really struggling. That’s when you might notice an opportunity to step in with some of the specialty modes (like Night mode or Manual), but Auto will still give it the old college try if you don’t have time for trial and error. Just point and shoot. All of the following were shot with Auto and haven’t been modified save for cropping and scaling. Click the buttons below to switch between the images.
Zoom, zoom, zoom
Of course, the headline feature of the ZenFone 3 Zoom is the 56-mm lens that facilitates 2.3X optical zoom and brings the action a little closer without the loss in quality you get with digital zoom. In photography, optical zoom is preferred because it magnifies the point of focus while still using the entire sensor to capture the photo. Digital zoom, on the other hand, doesn’t really “zoom” at all. Instead, it crops down to the point of focus and enlarges that one area to fill the same resolution using interpolation. Changes to photo composition aside, you’d get a very similar result if you just cropped an unzoomed image using image editing software after the fact.
There’s no special mode or setting for optical zoom. Tapping the shortcut right above the shutter button switches lenses, letting you go between 1X and 2.3X with a single touch. This is pretty handy if you want to make full use of the optical zoom but absolutely don’t want to enter digital zoom territory. You can also pinch the screen to zoom in and out. To get a sense of the ZenFone’s zoom capabilities, check out the samples below.

If you’re not burdened by digital zoom prejudice, you can tap the zoom shortcut to jump to 5X digital zoom. Another tap brings you home to 1X, but you can pinch all the way to 12X digital zoom if you’re so inclined. Expect a noticeable drop in quality if you plan to take pictures with 12X digital zoom. At that point, it makes more sense to shoot with the optical zoom and then figure out just how closely you want to crop later on. Whether you’ll get a better result with a digitally zoomed photo or an image that’s been cropped in post processing is debatable (and depends on various factors, like the editing software you’re using and your camera’s processing software). If you’re just posting to Instagram, it probably doesn’t matter as much. If you plan to share the full-size photo or print it later, it makes a big difference. Just keep in mind that any cropping done in post can be adjusted through trial and error and undone if you don’t like it. The same is not true of a photo captured with 12X digital zoom. That’s your only copy of the photo.
Things get way more interesting when you venture beyond Auto and into the other preset modes. For example, Auto does pretty well at night, but low-light photography with any smartphone is a lesson in patience and perseverance if there ever was one. It’s hard to get consistent results, and while Auto does its best, sometimes its best just isn’t good enough.
When the lights go down
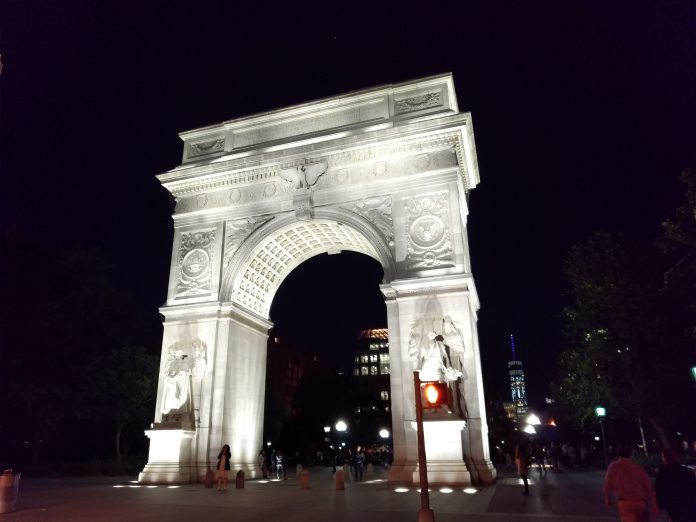
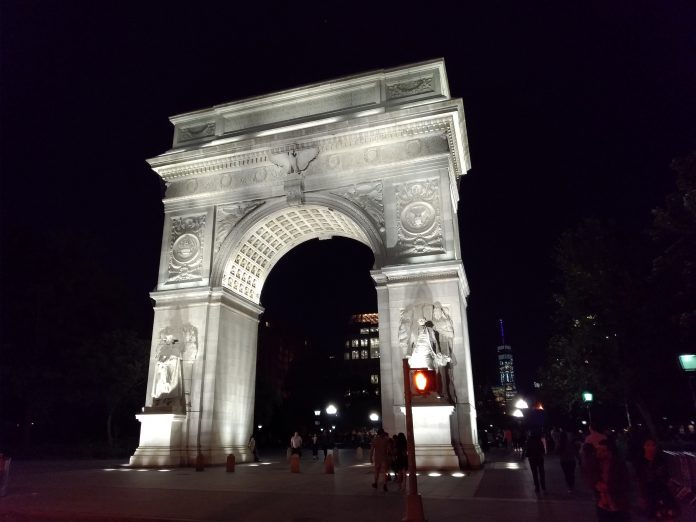
When Auto isn’t cutting it in dimmer settings, the determined (and reasonably steady-handed) can switch to Night mode, where a slower shutter speed gives darker scenes a boost in exposure. I took the photos below at about 10:30pm, first with Auto and then with Night mode. Auto doesn’t do too badly because there’s quite a bit of light on the Washington Square Arch, but the camera loses detail on the white marble in a quest for overall brightness. It doesn’t understand that brighter is not better in this case. In contrast, Night mode sacrifices some brightness to get a clearer shot. You see less light in the arch, and though the image isn’t quite as visually arresting, it captures more of the detail in the stone work, which is what I wanted.
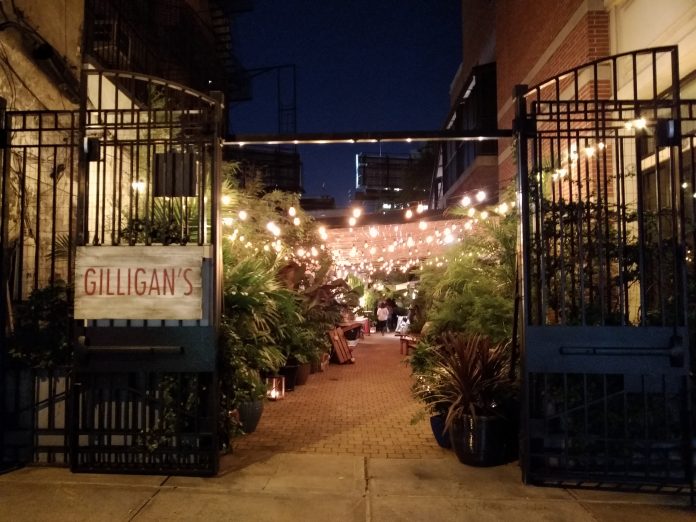
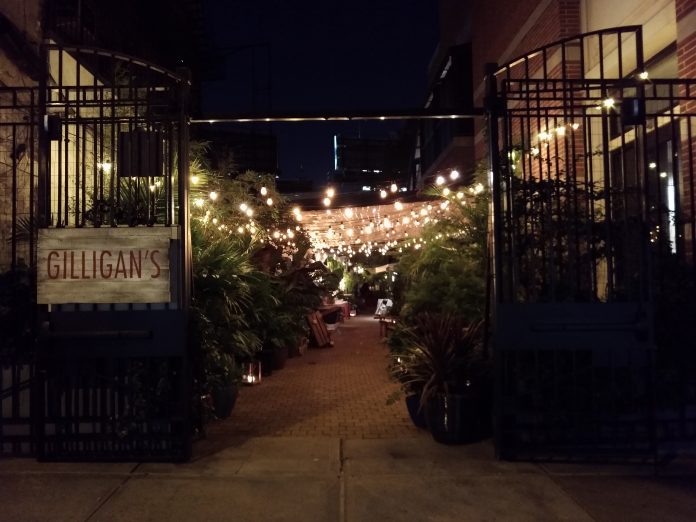
 Another example of Auto’s misguided attempt to boost brightness can be seen in the noise that appears in the patio scene below. With Night mode, there’s less noise in general, especially in lighter areas. It still looks like photo was taken at night, and the string lights actually look like lights instead of blobby orbs leaking yellow light into the surrounding area.
With Night mode’s slower shutter speed, you can reduce the risk of blur if you steady the camera on a table, window sill, bollard, or any other kind of makeshift tripod. Still, practice makes perfect, and external props are not necessary for good results. As long as you’re not shaking like a leaf, the ZenFone’s optical image stabilization can account for minor tremors. I took all of the above shots freehand and got ‘em in one take.
Another tip for nighttime photography: after you tap to focus in Night mode, you can slide the exposure up and down via the on-screen controls to better suit the scene you’re trying to capture. Like Auto, Night mode can sometimes be a touch opinionated in what it thinks is best, so this little trick affords you more influence over the end result. It’s how I was able to get those string lights under control.
Making the most of HDR
HDR, or high dynamic range, is a fairly standard feature for smartphone cameras these days. When you’ve got contrasting areas of light and dark, the camera is forced to choose which area to expose correctly. HDR balances the scene by capturing multiple exposures to create a merged result with an improved range of colors and contrast. It’s very useful for landscapes if you have something darker in the foreground or shadowy areas that can’t be captured without blowing out details in the lighter areas, like the sky.
The ZenFone 3 Zoom actually has two kinds of HDR. The first you’ll encounter is Auto HDR, the one that’s called to action as you shoot in Auto. Auto HDR captures just one image and uses software processing to adjust contrast. Like an automatic flash, the camera decides when and where it’s necessary, and you can force it off, force it on, or leave it on auto. Save for the indicator on the screen to say it’s set to Auto/On/Off, you likely won’t notice Auto HDR working its magic in the background. The Zoom shows you a preview of the HDR image on the display in real time, and you can tap around on the screen to adjust the exposure before you press the shutter button.
HDR Pro is accessed via the modes menu and is a more traditional implementation of HDR. It captures three exposures in quick succession and processes them to create a single image with a wider dynamic range. With the update to Nougat, the ZenFone’s Zoom’s Auto HDR has been upgraded to HDR Pro to save you from having to actively select it from the modes menu. Here’s a couple of samples of HDR on the Zoom. Note that these are both HDR Pro, because I’ve already updated my Zoom to Nougat.
It’s not always easy to determine if HDR can help a shot or not. There’s no ‘right’ time to use HDR. Sometimes a high contrast image with a dark silhouette is the desired effect, for example. And if you’re shooting in bright, sunny conditions, you may notice that HDR can have an adverse effect on colors that were already vivid to begin with, giving them a slightly dreamy look. But that could be what you’re going for, and whether or not that’s a good thing is subjective. Given how fast HDR Pro is, (and how easy it is to toggle Auto HDR on and off while shooting), I’d recommend capturing both an HDR and non-HDR image of the same scene so you can decide which you like better later on.
Pretty as a portrait
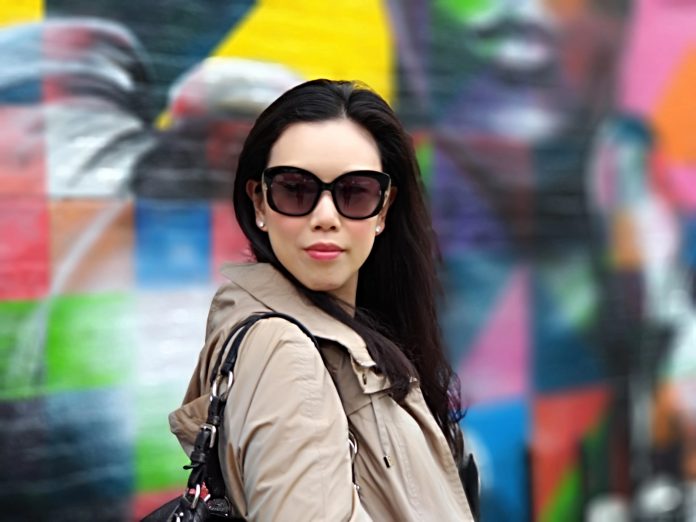
One of my favorites of all the preset modes is also the simplest, at least in terms of operation. Introduced with the update to Android N and made possible by the ZenFone 3 Zoom’s dual camera setup, Portrait mode uses both its 25-mm and 56-mm lenses to give you that shallow depth of field effect you see in professional portraits. Lots of editing software and third-party camera apps can fake this result on phones with just one camera, but the results are nowhere near as consistent, and they usually require either importing the photo or outsized effort in capturing it (like moving around or multiple exposures). The Zoom captures the shot in a single exposure, and the processing time is minimal.

Outside of decent composition and tapping to ensure the camera knows where to focus, shooting in Portrait is pretty effortless. Since it uses the zoom lens to capture the part of the image that’s in focus (the second camera gathers light and other information necessary to create the blurred effect), you do need to be a little farther away from your subject compared to shooting in Auto. That means Portrait mode selfies are a no go unless you’ve got really, really long arms (or a criminally uncool selfie stick). Portrait mode really works best when you can see what you’re shooting, so maybe have a friend take your Portraits for you.
You can also slide to adjust the aperture, increasing the blurring effect or softening it up. I maxed it out for the shots you see above and below because go big or go home (but also because I found it to be the most reliable way to produce a good result). You’ll see the level of blur reflected in real time on the phone’s screen, so you can play around with it on the fly.
Manual transition
For day-to-day photography, the convenience and reliability of Auto can’t be beat. Save for the odd curve ball, it does really well in most situations and is a lot faster than fiddling with ISO, shutter speed, and exposure every time you reach for the camera. But anyone left high and dry by a camera incapable of getting the shot knows the frustration of a photo that is just out of reach. Ever see something so clearly with your own eyes only to realize there’s no way your phone is getting it? Two years ago, I hit the jackpot with a ticket for a red-eye flight on a cheap, no-frills airline that also happened to be a front-row seat to the Aurora Borealis. I don’t have any photos. A cursory search on Google will tell you that capturing the Northern Lights requires a long shutter speed, which my phone at the time obviously couldn’t give me. Perhaps I would never have gotten a good photo, but my phone’s “I’ve got flash, or no flash,” approach to the scene meant I couldn’t even try.
The seasoned smartphone photographer knows that sometimes Auto isn’t all that smart. Every now and again, it’s thrown off by wonky lighting or contrasting areas of light and dark. It’s frustrating and can make getting the picture you want difficult. If you’re married to smartphone photography, these are the times when you accept that you’re probably not going to get the shot and should just let it go. If you’re like me, “letting it go” often involves a brief rant about how the camera technology in our phones is capable of so much more and why, oh why, are we boxed in by preset modes and software that determines how we use them? Well, rejoice! Manual mode is the savior we seek. Before Instagram filters, there was Manual, and it can help you get the shot you want with minimal edits later on.
Here’s a dirty little secret: all those professional photographers posting photos on Instagram with their smug #nofilter captions are stacking the deck. That hashtag might as well say, “Here’s one I made earlier.” While you’re juicing the colors with the saturation slider, boosting brightness, dropping highlights, and blurring out the background using tilt shift, practiced photographers are doing as much of that as possible before they even hit the shutter button. Settings like ISO, shutter speed, white balance, and exposure value can all be tweaked to get you a better unedited photo in most situations. Once you get familiar with shooting in manual, it’s hard to go back to Auto, even when conditions are optimal.
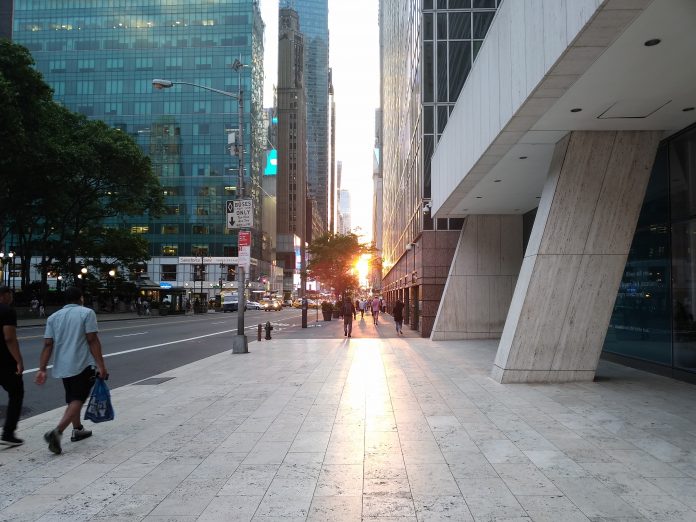
There’s no two ways about it, shooting in Manual is way more effort, and not all shots are worthy. My pretty coffee cup does not warrant anything beyond a quick snapshot. But even in situations where you do want the perfect shot, the complexity can be a major turn off if your primary goal is just capturing the moment. Say you’re waiting to cross the street and spot a dog riding in the sidecar of a motorcycle. Manual is not the mode you want. But capturing a glimpse of the setting sun between two buildings is way less time sensitive, so you can play around a little.
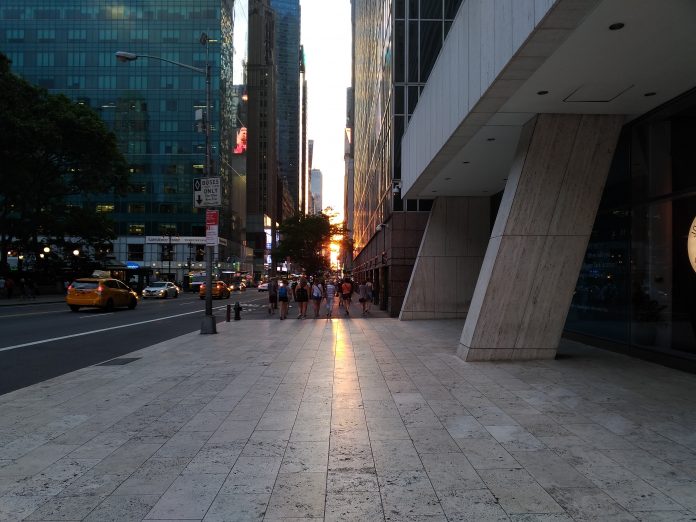
The first shot below was taken with Auto. It looks fine but is a little too washed out for my tastes. The camera made it look way brighter out than it really was and almost completely lost the dusky feel that prompted me to take the picture in the first place. When I switched to Manual, I adjusted the exposure value just a little to remedy the blown-out portions of pavement and cut some of the glare from the sun, bringing detail back into the buildings in the background. It took just a few seconds, but I got the result I wanted.
Switching from the comfort and convenience of Auto to a full manual experience can be daunting. The best way to get familiar with shutter speed, ISO, and exposure values is to just activate Manual mode but not actually change anything. The Zoom will stick with automatically determined values for all of the above, but they’ll be overlaid on the screen so you can see what the camera is doing.
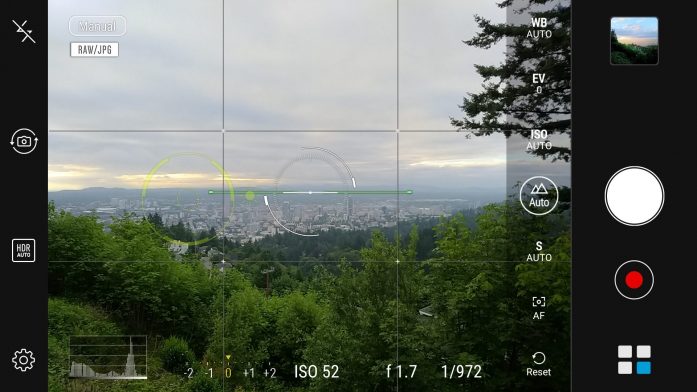
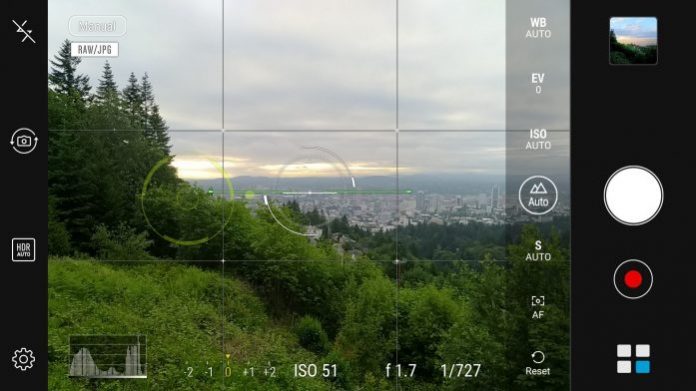
Pay attention to the numbers as you shoot and watch how they change depending on where you point the camera. You can snap a quick shot for insurance, and then spend some time fiddling with different values to practice with the controls. Below are some photos that I captured first with the camera-selected settings before tweaking manually to get the desired result.
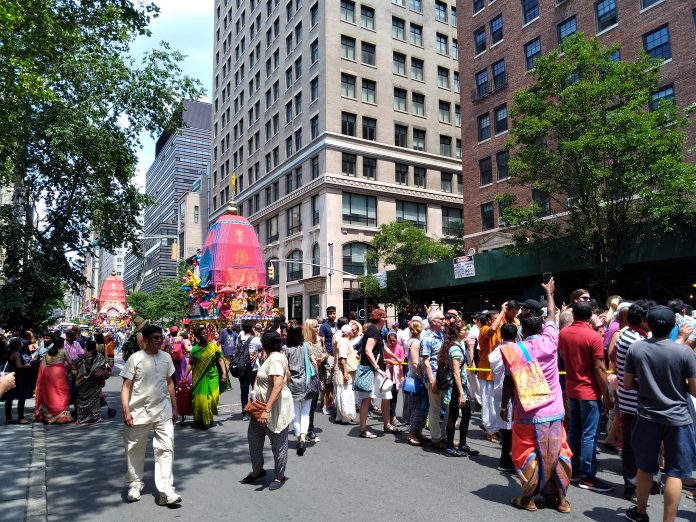
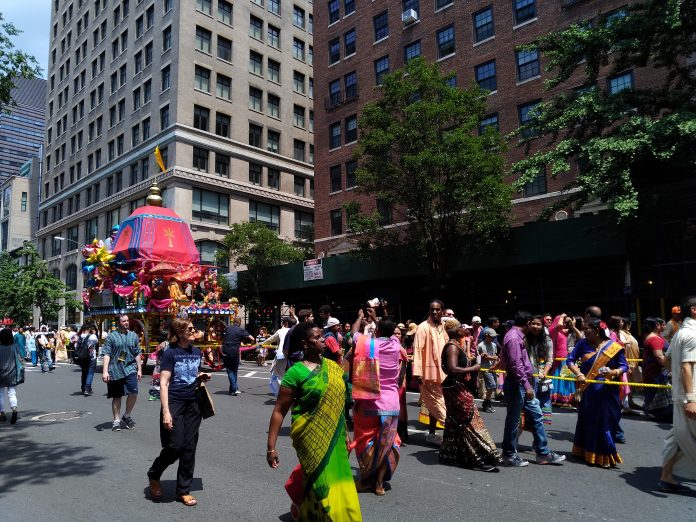
In the Hare Krishna parade, I noticed that the camera was blowing out anyone in white clothes, and the colors of the parade floats were a little washed out. You can see I got more vivid colors with a longer exposure and a lower ISO.
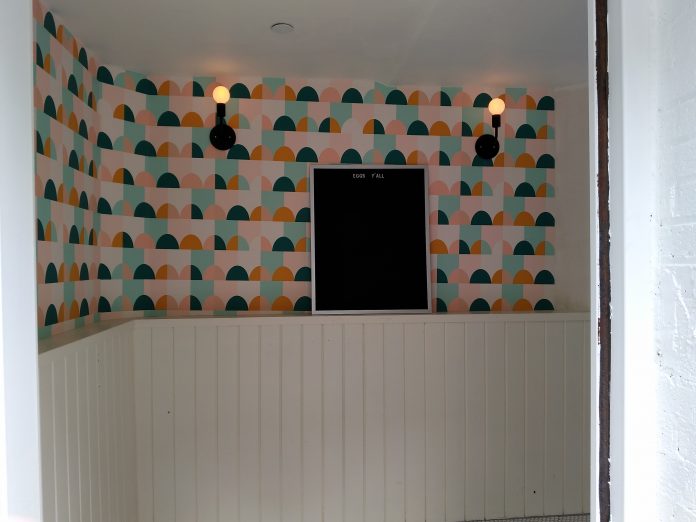
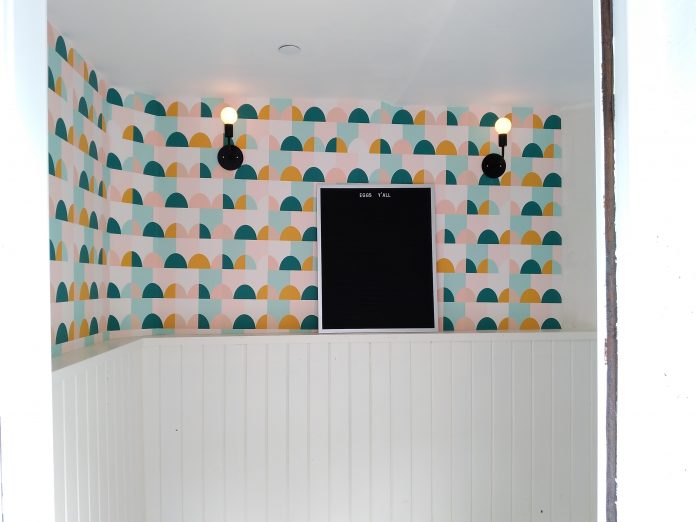
The inside of the foyer of this cafe, with its clean white paint and retro wallpaper, caught my eye as I walked by. Unfortunately, it was also quite dimly lit and fairly closed in, which meant the contrast translated pretty poorly on camera. To get a better shot without going inside the small entry-way, I lowered the shutter speed and increased the ISO to make the colors pop without completely blowing out the white paneling.
The Zoom’s white balance is on point almost 100% of the time. It’s so rare that I mess with it at all. However, this happy yellow flower came out looking quite blue because of the evening light, and that just won’t do. I warmed things up with a pretty heavy-handed adjustment to the white balance, lowered the ISO, and opted for a slightly longer shutter speed to make sure the image was well exposed.


It shouldn’t take you more than a day to get a feel for what each setting does. Then you can start to have fun experimenting, shooting the same scene in three or four different ways. The ZenFone 3 Zoom has a 5,000mAh battery, so you don’t need to worry about heavy camera use sapping the device’s energy before the day is done. I took the Zoom on vacation, and no amount of my relentless messing with Manual or any of the other modes ever killed the battery before bedtime.
One last thing about shooting in manual, and this is definitely a “best for last” feature: the update to Android N brings with it the option to shoot in RAW. RAW files are massive because they don’t go through the same processing and compression that JPG files do, but that also means you don’t experience any of the data loss associated with compression. When you shoot in RAW, all of the image data captured by the camera’s sensor remains intact, which gives you a lot more power when editing your photos. When all’s said and done, you can only do so much with an underexposed JPG. You may be able to pull some detail out of dark areas, for example, but if the data isn’t there, there’s nothing to retrieve. That means there’s more pressure to get it right when you’re taking the photo. With a RAW file, you’ve got all of the image data and a wider dynamic range to work with. If your white balance or exposure is a little off, there’s a good chance you’ll be able to fix it in post.
The ZenFone 3 Zoom also creates a JPG when shooting in RAW. When you transfer the photos to your computer, or even if you’re just backing up to Google Photos, you’ll see both versions of each image, one after the other. You can use the smaller JPG if you just want to share the photo over email, and save the RAW file for editing. To start shooting in RAW, go to the settings menu in Manual mode and check the box next to “Save RAW file.”
Quick fire
Manual mode and the ability to shoot in RAW are great, but the true beauty of smartphone photography is that you always have a camera when you need it most. Heavy equipment, rationing film, and remembering to change lenses before the cake and candles come out are non-issues. But a long battery life, unlimited exposures, and a lightweight, portable form factor can’t do anything about the challenges of those ‘blink and you’ll miss it’ moments.
When it comes to getting your kids to look at the camera, capturing everyone smiling at the same time, or snapping a photo in a busy street without passersby ruining the shot, timing and quick reflexes are half the battle. Thankfully, the Zoom has a range of modes to help make sure you get the photo you want, no matter what obstacles stand in your way.
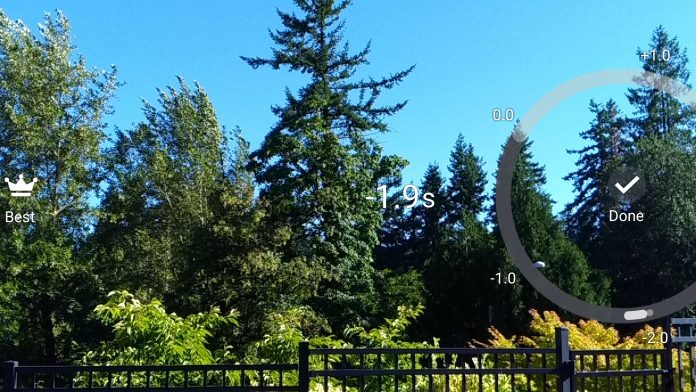
Instead of taking multiple pictures in the hope that you get one good one, Time Rewind captures a video that covers the moments before and after you hit the shutter button. Rather than a preview of your photo, you’ll see a three-second video clip that you can scroll through frame by frame to select the best shot.

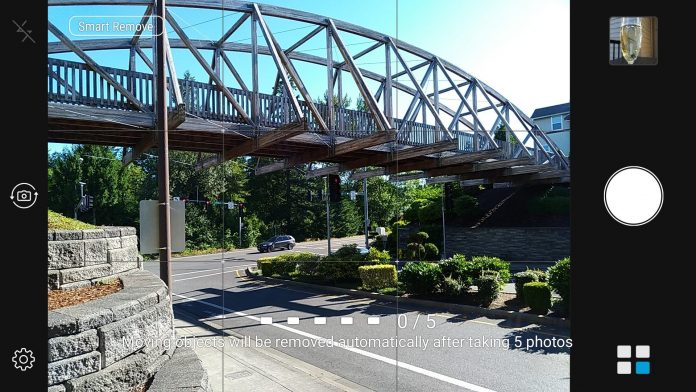
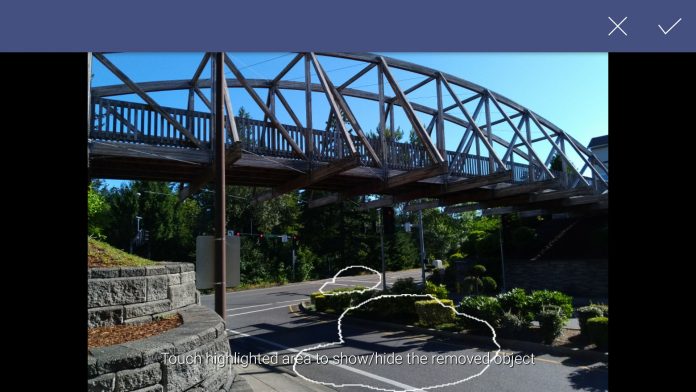
Also on hand to curb mistimed photos is Smart Remove. This mode takes five photos in quick succession, and then removes any moving objects or people in the background that might be ruining your photo. You’ll be able to tweak which objects are removed afterward, just in case there’s something you actually want to keep.
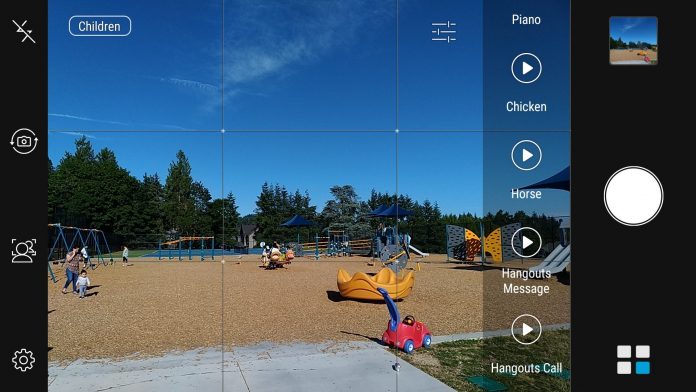
Children mode utilizes face detection to automatically trigger the shutter button when it detects children in the frame. (It also works with grown ups, so family shots can benefit from this setting, too.) To help get everyone looking at the camera at the same time, a range of sound effects is available and can be fired via buttons on screen. No more, “Watch the birdie.” This birdie makes noises!
All Smiles uses the same face detection technology as Children mode, but throws in a dash of the Smart Remove editing magic for good measure. Built for group photos, when it can sometimes be impossible to get everyone smiling at the same time, All Smiles takes five shots and then lets you build the perfect picture by selecting the best facial expression for each person.
A different point of view
The auto capture and face detection modes are really useful in very specific scenarios, but there are also a bunch of broader camera modes that are fun to play around with no matter where you are. Timelapse, for example, can be set to capture still frames at regular intervals (from one to five seconds apart) and play the resulting series of images back as a video at 30 frames per second. For very still scenes, longer intervals are fine. I went with the default one-second intervals for this video of Grand Central’s main concourse to make sure I got all of the people milling about. Don’t forget to balance your phone on something steady to eliminate camera shake.
I also used my train change in Grand Central as an opportunity to play around with Miniature mode, which mimics the selective focus of tilt-shift photography to make certain objects in your photo appear smaller. The level of background blur can be turned up or down via a slider on the screen, and a second slider allowed me to boost saturation for a funky Toy Town effect on this tiny lady. Instagram fans will also recognize the ability to enlarge or shrink the point of focus by pinching, as well as the ability toggle between radial and linear points of focus by tapping the options overlaid on the screen.

Like Timelapse, GIF mode appreciates a solid surface on which to steady the device. It captures up to 30 photos in quick succession and strings them together to create an animated GIF. Unlike Instagram’s Boomerang, which creates an MP4, the ZenFone actually creates a .GIF file, so you can easily upload to sites like Giphy or Imgur without having to convert the file first. Note that after you capture your GIF, there’s a slider to set the speed of playback as well as the option to reverse the loop. You can’t change these after you hit save, so choose wisely, friends.
Slowmo is another favorite of mine, even though I typically have very little reason to use it day-to-day and rarely think of it when the opportunity does present itself. Thankfully, that was not the case as I was watching this puppy play while waiting for my flight to board at Logan airport. Slowmo clips record at 720p (capturing 120 frames per second) and play back at 22 frames per second. You can adjust to 1080p via the settings menu, but be aware that playback will not be as smooth.
Super Resolution is helpful if you want to get a really high resolution image with limited noise. The camera combines four 12MP photos to make a huge 48MP image that has more detail and is very crop-friendly. The resulting file is larger than if you were to shoot normally, but you get more detail, which is what you want if you plan to make large prints later on.
Check out this nice rose, which I captured first with Auto and then with Super Resolution. Aside from the lighting (thanks, Auto HDR!), it’s hard to see the difference in quality, especially when the images are scaled down so small. But when you start zooming in on one area, you can see the difference in resolution very clearly. With the Auto version, there’s more noise in the leaves, and the edges of the petals are fuzzy. The Super Resolution version, on the other hand, could probably survive an even closer crop.


and then there’s panorama, for when a scene is too big and beautiful to capture with a regular photo. This one has been a standard function of smartphone cameras for the last five years, but the Zoom actually has both front- and rear-facing panorama modes. The rear-facing mode is ideal for landscapes, while the front-facing Panorama Selfie mode offers a little more room for group selfies, or even just a wider shot for individual narcissism. An on-screen animation offers instructions on when you should move the camera and in what direction. The Zoom stitches together the photos and smooths out the seams to give you nice wide shot. This example was taken in portrait, but if you use landscape, you’ll be shooting your feet below you and the sky above, which is also very cool.
Finally (and this one has little to do with photography really), there’s a QR code reader mode, which saves you from downloading a dedicated app that will only get buried in your app drawer anyway.
Selfie-obsessed
I’m not super into solo self-portraits, but I do use my front-facing camera most days for video messages, and I can’t deny its benefits for those “everybody in” group shots when asking a stranger to take the photo just isn’t an option. Regardless of how few selfies I take, I definitely do not miss the VGA cameras we had to suffer through back in 2010 and 2011, when front-facing cameras were just starting to appear on phones. The Zoom’s 13MP camera takes great selfies in daylight or total darkness, so you won’t find yourself guessing with the rear-facing camera just so you can use the flash. I went into a dark, windowless room and turned off all the lights to get the nighttime shot below. I couldn’t see my hand in front of my face, but the camera had no problem getting the shot thanks to the on-screen flash.


Selfies can also be enhanced by an optional Beautification mode. I rolled my eyes the first time I used this feature because with every setting maxed out, the results are pretty insane. I know how to apply makeup, I do not need software for that. However, Beautification mode has since earned its place in my impossible quest to look 22 forever. Sliders are on hand to tweak various effects, so you can achieve a more subtle (read: believable) look with the artificial blush and skin brightening. Other options, like eye enlargement and cheek slimming, are also available, but I mostly stay away from those. Less is more, and all that.


It’s worth noting that you don’t actually have to activate Beautification mode before you start snapping away. You can shoot in Auto and add the effects later to shots taken with either the front- or rear-facing cameras. You can even beautify a photo taken in Portrait mode if you like.
If Beautification mode is is a bridge too far, but you still want a filter, Effect mode (available with both the front- and rear-facing cameras) allows you to overlay any one of 11 effects, from grayscale and sepia to more out there options like pencil sketch and the heart-laden “Romance.” Yet more effects are available via the edit function in the Gallery app. There, you can layer as many as 18 additional filters, as well as add cartoon borders and take care of the usual cropping, straightening, rotating, and mirroring.
Wish you were here
The ZenFone 3 Zoom puts you in full control of your photos without weighing you down with another device that needs to be charged up and looked after when you’re out and about. Point-and-shoot shutterbugs have ample specialized modes to help them get the most out of the camera without time-consuming fiddling with settings, while aspiring photographers can shoot in RAW and cut their teeth on intuitive manual controls without breaking out the instruction book.
No matter what your photography goals are, the ZenFone 3 Zoom maximizes the potential of the device you’re already carrying with you every day. Weighing in at just 170g and measuring under 8mm thick, the Zoom is no bulkier or heavier than the average smartphone. And while you’d be forgiven for thinking that squeezing so much into such a svelte package would be a recipe for a sky high price tag, it’s not. The Zoom costs just $329 USD or $479 CAD, unlocked with no contract, so it’s more affordable than the high-end phones available today. Check out the table below for details on where to buy the ZenFone 3 Zoom in the US and Canada. You can read more about the ZenFone 3 Zoom in our hands-on article here.
| Model number | ZE553KL |
|---|---|
| US Availability | ASUS Store Amazon Fry's Newegg Best Buy |
| Canadian Availability | Canada Computers Memory Express Newegg Best Buy NCIX |